Keeping particularly important emails in a users mailbox over a long period of time chews into available disk space. One common option is to transfer these emails to a PST file either on the users machine or a network share. Doing this will save space on the mailbox server but will most likely cause problems when you try to collect the data again. You have to search for the PST files, hope they are not password protected and after that search through the files themselves looking for the emails you want to restore.
There are two methods of managing retention compliance in Exchange 2010:
- Use 'Managed Folders' as used in Exchange 2007
- Use 'Retention Tags' a new approach used only in Exchange 2010
Using Managed Folders
Managed folders involves the user deliberately dragging their important emails into
administrator built folders which are visible in Outlook. The point to take home here is that the user has to do some dragging action! A lot of people simply can't be bothered to file emails into folders and prefer to search through their mail looking for key words.This is where retention tags can be used. We will talk about that later.
There are 4 main steps to managed folder configuration:
- Create managed folders
- Set managed content settings
- Create managed folder policies
- Apply the managed folder policy to the mailbox
- Schedule the messaging records management enforcement process
1.
Create the Managed Folder
Managed folders come in two flavours. Default and custom. The default managed folders include the familiar folders like 'Inbox' and 'Sent Items'. You can create a custom managed folder that appears under the folder 'Managed Folder'.
1. Open the EMC and browse to the Organization Configuration Mailbox node in the Console tree.
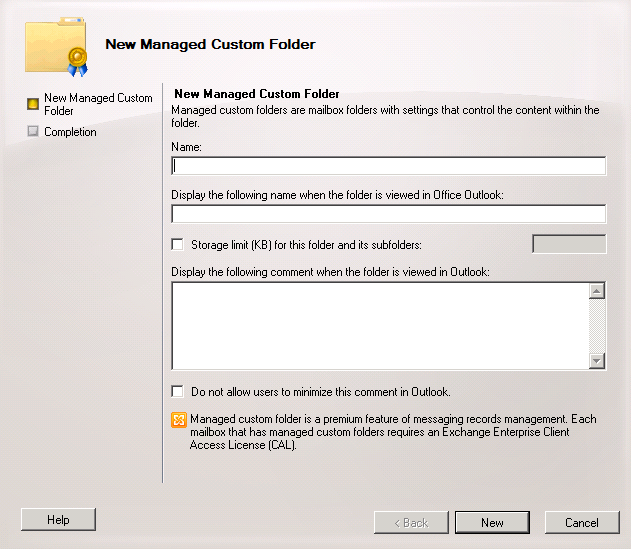
2. In the Actions pane, click the New Managed Custom Folder task to launch the configuration wizard.
3. Enter the name of the folder in the Name field. The field below it can be used to define a different name when the folder is viewed in Outlook. By default, this field is set to the same value that you type in the Name field. You can define a storage quota in KB and also set a comment for this folder that the user sees when the folder is opened. Enter this comment in the field Display The Following Comment When The Folder Is Viewed In Outlook. If you check the box Do Not Allow Users To Minimize This Comment In Outlook, then the comment is always visible to the user.
You can do the same in the shell:
[PS] New-ManagedFolder -Name 'Test Folder' -StorageQuota '51 MB' -Comment 'This folder is used only testing' -MustDisplayCommentEnabled $true
2.
Set Managed Content Settings
In this step you define how long items stay in a folder before an action is performed. You can also choose to forward a copy of any message placed in the folder to another mailbox (journaling).
1. Right click the Custom Managed Folder created in step one. This will launch the following window:
2. In the New Managed Content Settings wizard, type a name for content settings, such as Delete After 12 Months.
3. From the Message Type drop-down list, select the type of content that you want this setting to apply to. For example, you can apply the setting to specific items such as email only. Or you can apply the setting to every item type by choosing All Mailbox Content.
4. Check the Length Of Retention Period (Days) box and type the number of days that you want the items to be retained before an action is taken on them.
5. In the Retention Period Starts box, you can choose when the retention period starts. It can start either when the item is delivered or when it is moved into the folder. For example, if you want to create a setting to delete items after one year, you could set the retention period for 365 days.
6. In the field Action To Take At The End Of The Retention Period, choose what happens to the item when the period is over. If you choose to move it to a managed folder, click the Browse button to select that folder. Then click next.
7. At the Journaling screen, you can choose to forward copies of the message to a mailbox when it’s placed in the folder. Check the Forward Copies To option and click the Browse button to select the mailbox. You can also define a label for the message in the field Assign The Following Label To The Copy Of The Message. Doing so can make the messages easier to sort through. Click Next to continue.
The settings for the managed folder are now configured and the folder is ready to be added to a managed folder policy.
3.
Create Managed Folder Policy
A managed folder policy will be used to link the created managed folder to your mailboxes.
1. Open the EMC and browse to the Organization Configuration Mailbox node in the Console tree
2. Select the New Managed Folder Mailbox Policy task in the Actions pane.
3. In the New Managed Folder Mailbox Policy wizard, enter a name for this policy in the field
Managed Folder Mailbox Policy Name.
4. Click the Add button to add a managed folder to this policy. The Select Managed Folder dialog box will be displayed. Select either a managed default folder or a managed custom folder and click OK.
4.
Apply the Managed Folder Policy to Mailboxes
1. Browse to the Recipient Configuration Mailbox node in the Console tree.
2. From the list of mailboxes displayed in the Results pane, select one or more mailboxes that you want to apply the policy to.
3. Click the Properties option for the selected mailboxes in the Actions pane.
4. In the properties dialog box, select the Mailbox Settings tab.
5. Select the Messaging Records Management option in the list of mailbox settings and click the Properties button above the list.
6. In the Messaging Records Management dialog box, select the Managed Folder Mailbox Policy check box. Click the Browse button to select the policy that you just created.
7. click OK to close the Messaging Records Management dialog box.
5.
Schedule the Messaging Records Management Enforcement Process
The final thing we need to do is to schedule the messaging records management enforcement process to run at a specified time. The messaging records management enforcement process is disabled by
default. This means that although you have applied a managed folder mailbox policy to one or more recipients, the respective managed folders will not show up in the user’s client (Outlook 2007 or OWA 2007) until the process has run at least one time.
- In the Exchange Management Console, click the Mailbox subnode under the Server Configuration work center node.
- Select the respective Mailbox server in the Result pane.
- Now click the Properties link under the mailbox server name in the Action pane.
- Click the Messaging Records Management tab.
- The Messaging Records Management Enforcement Process is set to Never Run. Change that to Use Custom Schedule, then click the Customize button
- In the schedule, specify the times and days when the managed folder assistant
should run.
If you want to force a newly created managed folder to appear in the mailboxes, before the schedule runs you can use the Start-ManagedFolderAssistant CMDlet in the EMS to process all mailboxes immediately. This can be a resource-intensive process for the mailbox server and the network in general so be careful!