Pages

Showing posts with label Client Access Servers. Show all posts

Saturday, 28 May 2011

Don't put CAS in the Perimeter network!

The following link provides a good read on why Microsoft does not support putting your CAS servers in the DMZ. Well Done Exchange Team!

http://blogs.technet.com/b/exchange/archive/2009/10/21/3408587.aspx

Friday, 28 May 2010

The Client Access Server Role Pt4

Outlook Anywhere and Autodiscover

Microsoft Outlook 2007/2010 AutoDiscover is an Exchange Server 2007/2010 service, or more specifically Exchange Web Service, which allowed easy to configure Outlook 2007 profiles in your organization. In order to automatically configure and connect previous versions of Outlook to Exchange 2000 and 2003 Servers, you needed to do so using the Custom Installation Wizard from the Office Resource Kit or a similar tool. But now the users can configure their Outlook profile themselves, as they only need to click next a few times and specify their e-mail address and password. This will allow the construction of a Outlook 2007/10 profile to be built irrespective of whether the client machine is AD member or in a workgroup.

The last point made here is an important consideration. An AD machine member is able to query active directory and determine the location of the Exchange server and then communicate directly with that server. An employee on a home desktop would need to VPN into the office network and via the authenticated tunnel be able to make this query and exchange connection.

The Outlook client uses MAPI (Messaging Application Program Interface). It allows client programs to become 'messaging-aware'. Remember that its an API. It needs a transport mechanism to connect to your exchange server. Here comes RPC. MAPI calls are transported using RPC hence the expression MAPI over RPC. This all works great if your machine is physically on the office wire and AD authenticated or as mentioned you first VPN to the office. But you can also now connect Outlook without the use of a VPN!
RPC can be encapsulted by HTTPS which can then traverse your office firewall, become decapsulated by an RPC/HTTP proxy and allow communication with your Exchange server. This is called Outlook Anywhere and relies on the Autodiscover service for seamless Outlook configuration. To accomplish Outlook Anywhere and automatic configuration read on and follow the following steps...

Configuration of Outlook Anywhere

  • Outlook Anywhere is not enabled by default. Before enabling it ensure that you add the RPC/HTTP proxy feature on the CAS server.
  •  Because HTTPS is used, ensure that you have a suitable SAN certificate installed. I will detail how to do this in a later post. It is worth remembering that the client machine must have the trusted root certificate installed.
You can enable Outlook Anywhere by using the following EMS command. As you can see, you will need to determine the method of authentication, the public DNS reference that users use to connect from the Internet and if SSL offloading is used.


[PS] Enable-OutlookAnywhere -DefaultAuthenticationMethod Basic -ExternalHostName:mail.compulinx.com -SSLOffLoading:$false


If you need to change the authentication method later on you can by using the following:


[PS] Set-OulookAnywhere "EX1\RPC (Default Web Site)" -DefaultAuthenticationMethod NTLM

Configuration of Autodiscovery

Now the tricky bit! Autodiscovery allows the automatic configuration of Outlook 2007/10 and mobile devices. In a nutshell, the service provides an XML file to the client providing information on where and how to connect to your exchange server. Internal clients query AD (as domain members) to find the XML file. External Internet clients use DNS. Lets be more specific.

The LDAP query made by domain members is an attempt to locate the Service Connection Point (SCP) for the autodiscover service (which provides the XML file). The SCP object lives in the configuration partition with the other Exchange configuration objects. Try the following:
  • Open LDP
  • Click Browse then Search and supply the following information:
   

The output you should see will provide the ServiceBindingInformation (the location of the XML file). Something like this

   serviceBindingInformation: https://EX1.compulinx.local/Autodiscover/Autodiscover.xml

As you can see this is the Internal domain reference of the Autodiscover web service and the XML file. Outlook will then connect to the service using the location information provided and download the XML file.

The file will provide the URL location for a number of different services running on the CAS server:


You can trace what happens during the connection by typing the following:

[PS] Test-OutlookWebServices andrew@compulinx.com

The output is lengthy, but you can determine a lot from it:

The SCP is located
RunspaceId : 695c4068-4875-4de6-b59e-f4fabe967419
Id : 1019
Type: Information
Message: A valid Autodiscover service connection point was found. The Autodiscover URL on this object is https://EX1.compulinx.local/Autodiscover/Autodiscover.xml.


The Autodiscover Service is contacted

RunspaceId : 695c4068-4875-4de6-b59e-f4fabe967419
Id: 1006
Type: Information
Message: Contacted the Autodiscover service at https://
EX1.compulinx.local/Autodiscover/Autodiscover.xml.

The Availability Service is contacted (one of the URLs defined in the XML file)
RunspaceId : 695c4068-4875-4de6-b59e-f4fabe967419
Id: 1024
Type: Success
Message: [EXCH] Successfully contacted the AS service at https://
EX1.compulinx.local/EWS/Exchange.asmx. The elapsed time was 93 milliseconds.

The Unified Messaging Service is contacted (one of the URLs defined in the XML file)
RunspaceId : 695c4068-4875-4de6-b59e-f4fabe967419
Id: 1026
Type: Success
Message: [EXCH] Successfully contacted the UM service at https://
EX1.compulinx.local/EWS/Exchange.asmx. The elapsed time was 15 milliseconds.

The RPC/HTTP proxy is contacted (therefore Outlook Anywhere)
RunspaceId : 695c4068-4875-4de6-b59e-f4fabe967419
Id: 1128
Type: Success
Message: [EXPR] Successfully contacted the RPC/HTTP service at https://EX1.compulinx.local/rpc. The elapsed time was 0 milliseconds.


Notice here that the URLs reference the internal name space (ie. the domain.local reference as I am not using split DNS). This all indicates that internal users have no problem using autodiscovery to connect Outlook clients and have them configured automatically. But please understand that the URLs returned are internal references. Workgroup Internet users cant use these URLS (for one thing .local is being used and this is not a valid TLD).

External users must be able to obtain the XML file aswell and also the URLs returned must reference the public DNS namespace.
The CAS server running autodiscover can be found by updating the clients hosts file or updating the public DNS (i.e autodiscover.yourpulicname.com----public IP). During configuration of Outlook the user is promted to define a name, an email address and a password. The domain name is taken from this email address and the client appends autodiscover to the domain name. A public DNS lookup is made. Now the client will pass through the corporate firewall where HTTPS has been redirected to your CAS server.
The URL used is https://autodiscover.smtpdomain/Autodiscover/Autodiscover.xml. Once contacted the XML file will be returned. However this time the URLs are public.
You should make sure that the services autodiscovery puts you in touch with have both the correct internal and external references. From the test output above you can see that this needs to be checked for the following:
  • Web services virtual directory
  • Offline Address Book
  • Unified Messaging
  • Outlook Anywhere
The web services infact covers a lot of the services. Includes Out of Office, Availability Service for Free/Busy etc. and unified messaging. To determine current configuration type:

[PS]Get-WebServicesVirtualDirectory | fl

To configure the external and internal URLs type:

[PS] Set-WebServicesVirtualDirectory -Identity "EX1\EWS (Default Web Site)" -InternalURL https://EX1.compulinx.local/EWS/Exchange.asmx -ExternalURL https://mail.compulinx.com/EWS/Exchange.asmx -BasicAuthentication:$true

To determine the current configuration of the offline address book type:

[PS] Get-OABVirtualDirectory | fl

To configure the external and internal URLs type:

[PS] Set-OABVirtualDirectory -Identity "EX1\OAB (Default Web Site)" -InternalURL https://EX1.compulinx.local/OAB -ExternalURL https://mail.compulinx.com/OAB -RequireSSL:$true

To determine the URLs used Outlook Anywhere

[PS] Get-OutlookAnywhere | fl

To configure the correct external URL type:

[PS] Enable-OutlookAnywhere -DefaultAuthenticationMethod Basic -ExternalHostName:mail.compulinx.com -SSLOffLoading:$false
(You did this above when you enabled Outlook Anywhere)

You will also need to check and set the for ActiveSync:

[PS] Get-ActiveSyncVirtualDirectory | fl

[PS] Set-ActiveSyncVirtualDirectory -Identity "EX1\Microsoft-Server-ActiveSync (Default Web Site)" -ExternalURL https://mail.compulinx.com/Microsoft-Server-ActiveSync



    Wednesday, 5 May 2010

    The Client Access Server Role Pt3

    Exchange 2010 and Mobile Devices

    Mobile devices like PDAs and mobile phones can connect to Exchange 2010 to send/read email messages and other items such as calendar, contacts and tasks. The technology behind this is ActiveSync. ActiveSync is based on HTTP/HTTPS and is designed to connect mobile devices across the Internet.
     
    Enabling/Disabling ActiveSync

    ActiveSync is on by default  but you can turn it off by configuring IIS on the CAS. To do this do the following:

       1. Open IIS Manager from Administrative Tools
       2. In the console tree open the Application Pools node
       3. Locate MSExchangeSyncApplicationPool
       4. Select Stop from the Actions Menu
      This will disable ActiveSync. Conversely, choosing 'Start' will enable ActiveSync

      Enabling/Disabling ActiveSync per User

      ActiveSync can be enabled/disabled on a per user basis by performing the following steps:

      [PS] Set-CASMailbox "Andrew Stevens" -ActiveSyncEnabled $True
      [PS] Set-CASMailbox "Andrew Stevens" -ActiveSyncEnabled $False

      Restrict Mobile Devices

      By default users can synchronize any ActiveSync capable device with Exchange. You can prevent users from connecting with specific devices by using a devices 'Device ID'. However, you should understand that you can only determine this value once an ActiveSync device has connected and synchronized with Exchange.

      The device ID can be determined by using the Get-ActiveSyncDeviceStatistics:

      [PS] Get-ActiveSyncDeviceStatistics -MailBox: [alias] | ft DeviceModel, DeviceID, DevicePhoneNumber


      The DeviceID is based on International Mobile Equipment Identity. As mentioned this can be obtained once synchronization has ocurred. You can get the number by typing *#06# on the mobile device.
      You can add the device to a block list by typing the following:

      [PS] Set-CASMailbox [alias] -ActiveSyncBlockDeviceIDs 356059038180488

      You can block every device except the device you want to use by the following command:

      [PS] Set-CASMailbox [alias] -ActiveSyncAllowedDeviceIDs 356059038180488

      With the above command every device is blocked except this one.
      To clear the device id from the block list and the allowed list type the above commands but use $null  instead of the IMEI number:


      [PS] Set-CASMailbox [alias] -ActiveSyncBlockDeviceIDs $Null

      Mobile Device Policies

      Different devices used by your users have different features and settings. You can define which features and settings are provided for your users by establishing Mobile Device Polices. By default, a single policy is built and is visible:

         1. In the EMC, browse to Organization Configuration, Client Access node
         2. Select Exchange ActiveSync Mailbox Policies
         3. You should see a policy called default

      This policy is applied to all your users.

      Create A New Mobile Device Policy
       
      You can create a new policy in the EMS by typing the following:

      [PS] New-ActiveSyncMailboxPolicy "Managers"

      This creates a new policy with default settings and in this scenario the policy will be used for company managers.

      Set the New Policy to Users and Groups 

      You can define which groups/users should use the new policy by the following:

      [PS] Get-Mailbox andrew | Set-CASMailbox -ActiveSyncMailboxPolicy Managers

      Disable/Enable Mobile Device Features

      Once users and groups have been assigned you can control which features you want to be enabled/disabled.

      These include the following features:
      • Removable storage
      • Camera
      • Wireless network adapter
      • Infrared port
      • Internet sharing
      • Remote desktop
      • Synchronization with a PC
      • Bluetooth functionality
      These features can be turned off using the EMS. For example,

      [PS] Set-ActiveSyncMailboxPolicy "Managers" -AllowCamera $false

      This will turn off the use of the camera on the mobile device. However, this does depend on the device model and only really applies to Windows Mobile Devices.

      Manage Synchronization Settings

      You can also control synchronization settings. This would include the following items:
      How old emails and calendar items have to be before they are no longer synchronized
      Maximum size of email attachments
      Direct Push which pushes email to devices and does not require manual or pre-defined time synchronization at the device end
      Formatting of messages to HTML or text

      This can all be done using the EMS. For example,

      [PS] Set-ActiveSyncMailboxPolicy "Managers" -MaxEmailBodyTruncationSize 75 -AttachmentsEnabled $false

      This will allow maximum email size to be 75KB and disable attachments.

      Protection of Mobile Devices

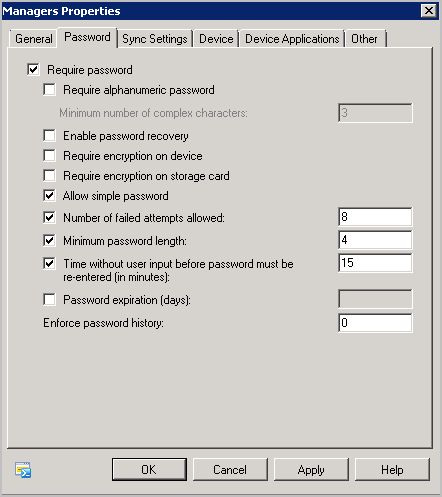
      Protection of devices is essential. A first step is ensuring password protection on the device. The password requirements can be quite granular:


      As you can see the password setup can be quite involved. You can see from the above diagram that the number of failed attempts is set to 8. Anymore than this and the device is wiped clean destroying all data stored on the device! So I suggest you select Enable Password Recovery. If you do this a secondary password is generated and maintained on Exchange. An administrator can obtain this password as can the user via OWA.


      If the administrator requires access to the recovery password simply select the users mailbox using the EMC and in the action pane click the Manage Mobile Phone option. The recovery password is displayed which can then be given to the user.


      A user that has forgotten her password can determine the recovery password by going through control panel in OWA.


      The recovery password can also be obtained using the EMS. You will need to enable the ShowRecoveryPassword parameter in order for the password to be displayed. Try the following:


      [PS] Get-ActiveSyncDeviceStatistics -Mailbox "Andrew" -ShowRecoveryPassword | fl DevicePhoneNumber, RecoveryPassword


      Remote Wipe


      You can perform a remote wipe of a lost or stolen device. When I say wipe I really mean WIPE! Data on the device and any storage cards will be erased. The process can be performed using both console and shell. To perform a wipe using the shell, perform the following 2 steps:


      1. Get a list of devices for the unfortunate user


      [PS] Get-ActiveSyncDeviceStatistics -Mailbox "Andrew" | fl Identity


      2. Wipe the device using the returned device ID

      [PS] Clear-ActiveSyncDevice -Identity [DeviceIdentity]


      You can also perform the same thing and send a notification email to inform the person of the wipe (just to keep them happy!)


      3. [PS] Clear-ActiveSyncDevice -Identity [DeviceIdentity] -NotificationEmailAddresses "andrew@compulinx.com"
       

      Friday, 30 April 2010

      The Client Access Server Role Pt2

      OWA provides your users with a many features that resemble Outlook. These features can be turned on or off using the console or shell. These features are called segmentation options.

      Disabling/Enabling Segmentation Options

      [PS] Set-OWAVirtualDirectory "SRV215\OWA (Default Web Site)" -ChangePasswordEnabled $false

      This cmdlet will turn off the users ablity to change passwords from OWA. The other features and cmdshell parameters are outlined below:


      Feature                        Parameter


      All Address Lists           AllAddressListsEnabled

      Calendar                       CalendarEnabled

      Change Password         ChangePasswordEnabled

      Contacts                       ContactsEnabled

      Email Signature             SignatureEnabled

      ActiveSync Integration  ActiveSyncIntegrationEnabled
      Journal                         JournalEnabled

      Junk Email Filtering      JunkEmailEnabled

      Notes                          NotesEnabled

      Premium Client            PremiumClientEnabled

      Public Folders             PublicFoldersEnabled

      Recover Deleted Items RecoverDeletedItemsEnabled

      Reminders/Notifications RemindersAndNotificationsEnabled

      Rules                           RulesEnabled

      S/MIME                     SMIMEEnabled

      Search Folders            SearchFoldersEnabled

      Spell Checker             SpellCheckerEnabled

      Tasks                          TasksEnabled

      Theme Selection          ThemeSelectionEnabled

      UM Integration           UMIntegrationEnabled

      Web Based Document Viewing

      Users can open and view Microsoft Office and PDF attachments even if the associated applications are not installed on their computers. This is called web ready document viewing. Documents are opened and viewed using Internet Explorer.
      To enable web ready document viewing for public and private computers do the following:


      [PS] Set-OWAVirtualDirectory -Identity "OWA (Default Web Site)" -WebReadyDocumentOnViewingPrivateComputersEnabled $true
      -WebReadyDocumentOnViewingPublicComputersEnabled $true

      Saturday, 24 April 2010

      The Client Access Server Role Pt1

      The Client Access Server Role

      Exchange Server 2010 now handles all client connections via the CAS role including connections made by Outlook MAPI clients. This connection type was previously handled by the mailbox server role. The CAS role now has the RPC Client Access Service which allows communication with AD and then the mailbox server. Having Outlook clients connect to the CAS role provides a significant improvement in terms of mailbox server failover.
      Clients can connect to Exchange CAS using a number of different technologies which include:
      • Web based email (Outlook Web Access or OWA)
      • Mobile devices
      • Outlook Anywhere
      Outlook Web Access

      OWA is enabled by default and ready to go on CAS machines without any more configuration. However there are some changes you can make to optimize your experience.

      OWA and External URLs

      You should ensure that the CAS machine has an external URL assigned. This might have been configured during Exchange installation. The external URL should be the public DNS name that clients use to connect to the Exchange organization from the Internet. The external URL is used for redirecting connecting clients to a CAS server in the same site as the users mailbox. Here's how it works:
      1. Bob provides a url in his browser, https://london.compulinxtraining.com/owa
      2. The London CAS server queries AD and determines from the GC that the mailbox for Bob is located in Paris.
      3. The London CAS server determines from AD the Paris sites CAS machines external URL.
      4. This external URL is then given back to Bob, https://paris.compulinxtraining.com/owa
      5. If Paris CAS does not have an external URL assigned, then the London CAS proxies the connection to the Paris CAS. Bob will stay connected to London and the London CAS will connect to Paris CAS on Bobs behalf.
      To set the external URL for the CAS server, I highly recommend that you perform the action in the Exchange console:
      1. Open the Exchange Management Console and browse to the Server Configuration > Client Access Node
      2. In the action pane, click Configure External Client Access Domain option
      3. Enter the external DNS name and add the name of the CAS server that will be connected to use the name defined.
      4. Click the configure button to set the external URLs on the CAS machines. The Exchange control panel URL should also be automatically configured to use the same URL as defined here.
      5. Select the Exchange Control Panel Tab
      6. Select the ECP virtual directory and choose properties from the action menu
      7. Define the URL as the same value as above but make sure you use the virtual directory of /ecp instead of the /owa
      The above method provides you with a single process to define the external URL and in my humble opinion should be used. However, the shell equivalent involves defining the external URL on a number of different virtual directories. Here's how:
      1. Set-OwaVirtualDirectory -Identity 'SRV215\owa (Default Web Site)' -ExternalUrl 'https://mail.compulinxtraining.com/owa'
      2. Set-OabVirtualDirectory -Identity 'SRV215\OAB (Default Web Site)' -ExternalUrl 'https://connect.compulinxtraining.com/OAB'
      3. Set-ActiveSyncVirtualDirectory -Identity 'SRV215\Microsoft-Server-ActiveSync (Default Web Site)' -ExternalUrl 'https://connect.compulinxtraining.com/Microsoft-Server-ActiveSync'
      4. Set-WebServicesVirtualDirectory -Identity 'SRV215\EWS (Default Web Site)' -ExternalUrl 'https://connect.compulinxtraining.com/ews/exchange.asmx'
      5. Set-EcpVirtualDirectory -Identity 'SRV215\ecp (Default Web Site)' -ExternalUrl 'https://connect.compulinxonline.com/ecp'
      As you can see the GUI method is considerably easier. The VDs configured are OWA,OAB,ActiveSync,EWS and ECP.

        Redirect the Default URL to OWA

        A useful adjustment to the default OWA settings is to ensure that users are automatically redirected to the OWA virtual directory if they neglect to define /owa at the end of the external URL.

        To redirect users to the /owa virtual directory perform the following steps:
        1. Open the IIS manager from Administrative tools
        2. Browse to the default web site and in the work area double click the HTTP Redirect icon
        3. Check 'Redirect Requests To This Destination' and supply /owa as the destination
        4. Click the Apply button on the left
        5. This will inherit to all virtual directories contained in the default web site. These need to be unchecked. The inheritance should be removed for the following VDs
                  Autodiscover
                  ecp
                  EWS
                  Microsoft-Server-ActiveSync
                  OAB
                  OWA
                  PowerShell
                  RPC
                  RPCWithCert
          Automatically use https

          It would be useful to ensure that https is used if users define http in the URL. If users forget to define https they receive an error message which could be confusing. Perform the following steps:
          1. Open the IIS manager from Administrative tools
          2. Browse to the default web site and in the work area double click the Error Pages icon
          3. In the actions pane click the add button to add a new custom error
          4. In the Add Customs Error Page dialog box, enter 403.4 in the status code field
          5. In the Response Action Box, click the option Respond With A 302 Redirect. In the absolute URL field, enter the complete HTTPS URL to OWA; eg. https://mail.compulinxtraining.com/owa and click ok.


                Wednesday, 3 March 2010

                Redundency of Exchange 2010 Client Access Servers

                The redundency method used with CAS is Network Load Balancing or NLB. The cluster of up to 32 servers is called a client access array. Broadly speaking the three steps involved in creating an array are:
                1. Install the NLB feature
                2. Create the NLB cluster
                3. Configure the client access array in Exchange 2010 
                It should be noted that if a CAS is also hosting a mailbox server role which is in a DAG, the CAS cannot be part of a DAG.

                To install the NLB feature on your CAS servers type the following:

                [PS] ServerManagerCmd -I NLB

                To create the NLB cluster on Server 2008 perform the following steps:
                1. Log in at a CAS
                2. Launch NLB Manager from Administrative Tools
                3. Choose Cluster, New to start a new cluster wizard
                4. On the Connect screen type in the IP address or FQDN of a CAS that will be in your CAS array. Try typing in the name of this CAS server, and click Connect.
                5. You may see two NICs listed. Select the NIC that is used for sending/receiving client access traffic
                6. On the Host Parameter screen, select the priority of the host. 
                7. On the Cluster IP Address screen, click the Add button to add the IP address of the cluster. In the Add IP Address dialog box, type the IP address, mask and click OK.
                8. On the cluster Parameters screen, type the FQDN of the cluster, e.g. nlb.yourdomainname.com.
                9. In the cluster operation mode select multicast mode.
                10. On the Port Rules Screen, select the port rule with the start port of 0 and the end port of 65535 and click the edit button
                11. In the Add/Edit Port rule dialog box, change the Port Range From value 1024,and click OK. What does this do? Well, it will modify the load balancing port range to include the dynamic ports that can be assigned by the RPC endpoint mapper. 
                12. Add another rule and set the from and to values to 135 using TCP. This makes sure that the RPC endpoint mapper is load balanced as well.
                13. You will need to add any other ports that are to be load balanced by the CAS array. This of course will mean adding port 80, 443 (and ports for IMAP and POP3 but we will not be testing these services).
                14. Click Finish to create the NLB cluster with the first node added.
                15. Now the cluster has been created you will have to add the other nodes. Right click the cluster and select Add Host to Cluster from the Menu.
                16. Type the FQDN of the CAS server you wish to add
                17. Like before, select the correct NIC
                18. Provide a priority number but you do not need to adjust the port rules.
                19. Finish to close the wizard. 
                20. It may take some time before the CAS NLB cluster fully converges. Don't worry. It will!
                Now the NLB cluster has been created, in step three we configure the CAS array. 

                The CAS array involves creating a site linked object in Active Directory. This means that all CAS servers in a particular site will be in this array. Mailbox servers will be logically tied to this array by virtue of their 'RpcClientAccessServer' attribute on the mailbox database. Remember this attribute on the database will reference the RpcClientAccess service running on the CAS servers which you just network load balanced. The attribute will point to the cluster which of course consists of at least 2 CAS servers.  

                To create the CAS Array object and to assign it to your London site type the following:

                [PS] New-ClientAccessArray -FQDN nlb.compulinxtraining.com -Site London

                Thats it! Pretty simple really. However, we have the DB01 database created before the creation of the CAS array. This database will point to the CAS server before the creation of the NLB cluster. Try the following to determine this:

                [PS] Get-MailboxDatabase DB01 | fl Name,RpcClientAccessServer 

                This should display exactly which CAS server the database is currently looking at. To change it type the following:

                [PS] Set-MailboxDatabase DB01 -RpcClientAccessServer nlb.compulinxtraining.com

                So, thats how you configure redundency for CAS servers. Build an NLB cluster, build a CAS array object and then assign your database to use this object. Remember that any new databases will be tied to this array automatically.