Coming Soon!
MCSE,MCITP,MCT,MCTS
Tuesday, 25 January 2011
How to Setup Server 2008 SSTP VPN Server: Obtaining Server SAN Certificate by Advanced Request to StandAlone CA
Before you setup the VPN server you should sort out your certificates.If you have a Stand Alone Root CA the following post will help (I hope!)
Add the CA role using Server Manager. As mentioned the first thing to obtain on the VPN server is a server authentication certificate from the CA. You can do this using a variety of methods including these. Included is the following:
Using the Certificate Enrollment wizard with a standalone CA
1. In the Computer Certificates snap-in, right-click the Personal folder, point to All Tasks, point to Advanced Operations, and then click Create Custom Request.
2. Click Next
3. Click Proceed without enrollment policy, and then click Next.
4. In the Template field select No Template (Legacy Key) and For Request format, click either PKCS #10 or CMC. PKCS #10 is generally accepted by all CAs.

5. Click Next
6. Click the Details arrow, and then click Properties. You will need to configure all the certificate request options so that the issued certificate will be suitable for TLS/SSL.

7. On the Extensions tab click the Key usage arrow. In the Available options list, click Digital signature, and then click Add. Click Key encipherment, and then click Add.

8. Click the Extended Key Usage (application policies) arrow. In the Available options list, click Server Authentication and Client Authentication, and then click Add.

9. On the Private Key tab, click the Cryptographic Service Provider arrow. Because we selected the Legacy key in step 4 above, the Microsoft RSA SChannel Cryptographic Provider is enabled.
10. Click the Key options arrow. In the Key size list, select a key size. If desired, select the Make private key exportable check box. Do not select either the Allow private key to be archived or Strong private key protection check box.

11. Click the Select Hash Algorithm arrow. In the Hash Algorithm list, select the desired hash algorithm. E.g SHA-1

12. Click OK and then click Next
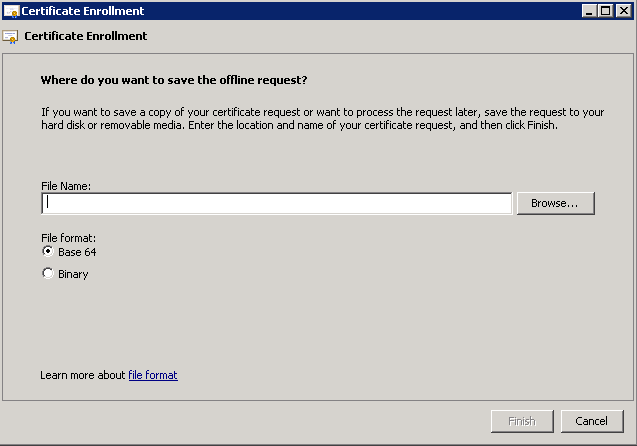
13. Enter a path and file name indicating where the request file will be saved and select Base 64 format and click Finish

Next, submit the certificate request and complete certificate enrollment by using Certreq.exe
1. Open a command prompt
2. Type certreq -submit -config <CertificateRequest.req>
E.g certreq -submit -config srvXYZ\CompulinxCARoot c:\VPNCertReq
This should return a RequestID. The request for your certificate will need to be issued by the CA administrator (the request will be found in the Pending Request folder. Simply right click the request and issue it).
3. Type certreq –retrieve -config and press ENTER. Where the CertificateResponse is the name given to the certificate you get back from the CA and will be placed in the directory you run the command from in command prompt
E.g certreq -retrieve -config srvxyz\CompulinxCARoot 19 MyVPNCert.cer
4. After you retrieve the certificate, you must install it. This command imports the certificate into the appropriate store and then links the certificate to the private key.
Type certreq –accept -config and press ENTER
E.g certreq -accept -config srvxyz\CompulinxCARoot MyVPNCert.cer
So, you need to submit, retrieve and then accept.
Add the CA role using Server Manager. As mentioned the first thing to obtain on the VPN server is a server authentication certificate from the CA. You can do this using a variety of methods including these. Included is the following:
Using the Certificate Enrollment wizard with a standalone CA
1. In the Computer Certificates snap-in, right-click the Personal folder, point to All Tasks, point to Advanced Operations, and then click Create Custom Request.

2. Click Next
3. Click Proceed without enrollment policy, and then click Next.
4. In the Template field select No Template (Legacy Key) and For Request format, click either PKCS #10 or CMC. PKCS #10 is generally accepted by all CAs.

5. Click Next
6. Click the Details arrow, and then click Properties. You will need to configure all the certificate request options so that the issued certificate will be suitable for TLS/SSL.
- On the General Tab under Friendly Name type a name for your certificate and a description
- In the Subject name area under Type, click Common Name
- In the Subject name area under Value, enter the fully qualified domain name of the server, and then click Add e.g www.compulinxtraining.com
- In the Alternative name area under Type, click DNS
- In the Alternative name area under Value, enter the fully qualified domain name of the server, and then click Add e.g www.compulinxtraining.com
- Repeat the last few steps and add all necessary DNS names (both external Internet registered names and internal DNS name of the VPN srvxyz.compulinxtraining.local for example)

7. On the Extensions tab click the Key usage arrow. In the Available options list, click Digital signature, and then click Add. Click Key encipherment, and then click Add.

8. Click the Extended Key Usage (application policies) arrow. In the Available options list, click Server Authentication and Client Authentication, and then click Add.

9. On the Private Key tab, click the Cryptographic Service Provider arrow. Because we selected the Legacy key in step 4 above, the Microsoft RSA SChannel Cryptographic Provider is enabled.
10. Click the Key options arrow. In the Key size list, select a key size. If desired, select the Make private key exportable check box. Do not select either the Allow private key to be archived or Strong private key protection check box.

11. Click the Select Hash Algorithm arrow. In the Hash Algorithm list, select the desired hash algorithm. E.g SHA-1

12. Click OK and then click Next
13. Enter a path and file name indicating where the request file will be saved and select Base 64 format and click Finish
Next, submit the certificate request and complete certificate enrollment by using Certreq.exe
1. Open a command prompt
2. Type certreq -submit -config <CertificateRequest.req>
E.g certreq -submit -config srvXYZ\CompulinxCARoot c:\VPNCertReq
This should return a RequestID. The request for your certificate will need to be issued by the CA administrator (the request will be found in the Pending Request folder. Simply right click the request and issue it).
3. Type certreq –retrieve -config and press ENTER. Where the CertificateResponse is the name given to the certificate you get back from the CA and will be placed in the directory you run the command from in command prompt
E.g certreq -retrieve -config srvxyz\CompulinxCARoot 19 MyVPNCert.cer
4. After you retrieve the certificate, you must install it. This command imports the certificate into the appropriate store and then links the certificate to the private key.
Type certreq –accept -config and press ENTER
E.g certreq -accept -config srvxyz\CompulinxCARoot MyVPNCert.cer
So, you need to submit, retrieve and then accept.
Sunday, 23 January 2011
How to Setup Server 2008 R2 Online Responder Service - Avoid the Dreaded 0x80092013 with SSTP VPN
In most cases, applications that depend on X.509 certificates, such as Secure/Multipurpose Internet Mail Extensions (S/MIME), Secure Sockets Layer (SSL), and smart cards, are required to validate the status of the certificates used when performing authentication, signing, or encryption operations. The certificate status and revocation checking is the process by which the validity of certificates is verified based on two main categories: time and revocation status.
Step One
Configure Enterprise CA to Support AIA Extension to Support OCSP
To advertise that revocation status information for a particular CA can be obtained via OCSP, the CA must include a pointer to the OCSP Responder in the certificate. This is done by adding an OCSP URI to the AIA extension of the certificate. This is a configuration made on the CA and will be applied to certificates issued by the CA.
1. Open the Certification Authority Snap-in on the CA, as an Enterprise Administrator
2. Right click on the CA name, and select Properties
3. Click on the Extension Tab. From the Select Extension drop down Box, select Authority Information Access (AIA). This is shown below. For Internet clients, select Add and enter a public DNS entry e.g http://www.compulinxtraining.com/ocsp

4. Check the Checkbox for Include in the online certificate status protocol (OCSP) extension.
5. Click OK, to close the CA Properties.
Step Two
Configure Enterprise CA with OSCP Signing Template
1. On the Enterprise CA, select Certificate Templates, right click and select Manage. This will open a complete list of the CAs templates in the Certificate Template Console.
2. Locate the OCSP Certificate Template, Right-click, and select Properties
3. On the Security Tab, add the hostname of the soon to be OCSP Server, and give the server Read and Enroll permissions to the template. Click OK.
4. In the Certification Authority management console, Right-click on the Certificates Templates node, and from the context menu, select New and then "Certificate Template to issue.
5. Select the OCSP Response Signing Template, and select OK.
Step Three
Installing and Configuring the OCSP Responder Role
1. To install the OCSP Responder, add the Online Responder role found under Active Directory Certificate Services
2. Open the Online Responder snapin in Administrative Tools
3. Select Revocation Configuration, right click and select Add Revocation Configuration. A wizard will open.
4. Name the configuration with a friendly name
5. Select a certificate for an existing Enterprise CA

6. Select Browse CA certificate published in Active Directory. Click Browse. You should see your CA certificate so select it and click OK.
7. Next you will need to select a certificate that will be used for signing OCSP responses. For a particular Revocation Configuration, the OCSP Signing certificate must be issued by the CA for which the OCSP Responder will answer revocation status requests. Select Automatically select a signing certificate and select the OCSP template you configured in step two above. Click Next.
8. The OCSP responder will obtain its CRL from the CA so you do not have to add any other provider. Finish the wizard.
- Time. Certificates are issued for a fixed period of time and considered valid as long as the expiration date of the certificate is not reached, unless revoked before that date.
- Revocation status. Certificates can be revoked before their expiration date because of multiple reasons such as key compromise or suspension. Before performing any operation, applications often validate that the certificate was not revoked.
Step One
Configure Enterprise CA to Support AIA Extension to Support OCSP
To advertise that revocation status information for a particular CA can be obtained via OCSP, the CA must include a pointer to the OCSP Responder in the certificate. This is done by adding an OCSP URI to the AIA extension of the certificate. This is a configuration made on the CA and will be applied to certificates issued by the CA.
1. Open the Certification Authority Snap-in on the CA, as an Enterprise Administrator
2. Right click on the CA name, and select Properties
3. Click on the Extension Tab. From the Select Extension drop down Box, select Authority Information Access (AIA). This is shown below. For Internet clients, select Add and enter a public DNS entry e.g http://www.compulinxtraining.com/ocsp

4. Check the Checkbox for Include in the online certificate status protocol (OCSP) extension.
5. Click OK, to close the CA Properties.
Step Two
Configure Enterprise CA with OSCP Signing Template
1. On the Enterprise CA, select Certificate Templates, right click and select Manage. This will open a complete list of the CAs templates in the Certificate Template Console.
2. Locate the OCSP Certificate Template, Right-click, and select Properties
3. On the Security Tab, add the hostname of the soon to be OCSP Server, and give the server Read and Enroll permissions to the template. Click OK.
4. In the Certification Authority management console, Right-click on the Certificates Templates node, and from the context menu, select New and then "Certificate Template to issue.
5. Select the OCSP Response Signing Template, and select OK.
Step Three
Installing and Configuring the OCSP Responder Role
1. To install the OCSP Responder, add the Online Responder role found under Active Directory Certificate Services
2. Open the Online Responder snapin in Administrative Tools
3. Select Revocation Configuration, right click and select Add Revocation Configuration. A wizard will open.
4. Name the configuration with a friendly name
5. Select a certificate for an existing Enterprise CA

6. Select Browse CA certificate published in Active Directory. Click Browse. You should see your CA certificate so select it and click OK.
7. Next you will need to select a certificate that will be used for signing OCSP responses. For a particular Revocation Configuration, the OCSP Signing certificate must be issued by the CA for which the OCSP Responder will answer revocation status requests. Select Automatically select a signing certificate and select the OCSP template you configured in step two above. Click Next.
8. The OCSP responder will obtain its CRL from the CA so you do not have to add any other provider. Finish the wizard.
Tuesday, 11 January 2011
How to Setup Server 2008 SSTP VPN Server Introduction
Hope you all had a good Christmas! In the next couple of posts I will showing you how to build SSTP VPN servers on server 2008 R2. The process is a little involved and will cover not only how RRAS configuration, but CA configuration and how to use the new Online Responder Service.
VPN technology has moved on in Windows Server 2008. Now we can use SSTP (as far as I can see just for 'Client to Router' connections). This means you can still VPN to a network in situations where the traditional technologies have been blocked (TCP 1723 PPTP for example). SSTP uses TCP 443.
A big problem I have found in the SSTP VPN is the certificate revocation check. Before a client manages to connect to the VPN server, a certificate revocation check needs to be made. The client will need to access the certificate revocation list (CRL) which is on the CA but could be hosted on another server. This check uses http not https. This can complicate things because you dont want Internet based clients connecting to an internal CA to check for revocation using unsecured http. You can publish the CRL to a Certificate Distribution Point (CDP) away from the CA. This can be to a web server. The client then receives the VPN certificate sent from the SSTP VPN server and will need to determine if its been revoked (by the way, depending on the method of client authentication, the client will need the CA root certificate and perhaps a user certificate - more on this later). The client can determine the CDP by referencing the CDP extension on the VPN certificate (which is usually an Internet registered DNS address). An HTTP connection is made to the CRL Web Server and the client downloads the full CRL. The client can check for revocation status and then VPN to the SSTP VPN server.
Server 2008 supports not only the traditional CRL method of revocation but also the Online Responder Service OCSP. The main advantage here is that the client does not require periodic downloading of a CRL. The client gets an accurate point-in-time status check to determine the validity of the certificate sent by the VPN server. A downside to OCSP is that it is supported by Windows 7 and Vista clients only.
Subscribe to:
Posts (Atom)