
In a earlier post I went through installing a single remote desktop session host server. The post can be found here. The screenshots shown below overview the installation of the RDSH role.
As this is a test lab, I will not be installing a Licensing Server.
So, install the RDSH role on both servers and add ‘Domain Users’ to the local ‘Remote Desktop Users’ group.
RDSH Certificates Template
We now need to configure the RDSH servers to use machine certificates obtained from an enterprise CA. All servers involved in the provision of remote applications to connecting clients require machine certificates. Each server will obtain its own machine certificate from an Enterprise CA. This will be used for remote desktop connections. However, I have found that you will need to share a signing certificate amongst both RDSH and RDCB servers (this certificate originated from RDSH1). I will show you how to create a suitable certificate template on the CA which we will use to enrol a needed certificate on each RDSH server.
Now that you have created a new certificate template that will be used by the Remote Desktop servers, you should define revocation information on certificates your CA will publish. This is detailed in an earlier post (See Step 1 Configure Enterprise CA to Support AIA Extension to Support OCSP). This post will also explain the importance of OSCP in overcoming any revocation errors that you might receive when connecting externally.
The next logical step would be to obtain suitable machine certificates for the RDS servers.
Manually Obtain Machine Certificates on Your RDS Servers
Now that the RDS certificate template and the correct revocation settings have been made, you can now obtain the necessary machine certificates. Use the following procedure:
Configuration of Remote Desktop Session Host Configuration and its Certificate (Do this on each RDS server)
To configure a certificate used to digitally sign the RDP file (Do this on both RDSH servers farm members)
I have found that it helps to use the same machine certificate across both RDSH servers and on the RDCB server. You will have to export the certificate with private key (therefore a .pfx file) from RDSH1 to RDSH2 and to RDCB. To export the certificate, just right click on the personal machine certificate in a MMC and select Export. Then import the certificate onto the other machines using a MMC once more. Once the certificate has been exported/imported you can now deal with configuring that certificate to digitally sign the RDP file.
First, configure a certificate used to digitally sign the RDP file by using RemoteApp Manager.
Domain joined clients will automatically have the CA root certificates stored in their trusted root store. They will not need personal machine certificates only the trusted root certificate in order to validate certificates received from the RDSH servers.
Setting Up Authorization
A chain of authorization needs to be set up. The RDSH servers needs to authorize the RDCB and in turn the RDCB will authorize the RDWA server. You must add Web Access and Connection Broker Servers to TS Web Access Group on Session Host Servers (RDSH1 & RDSH2)
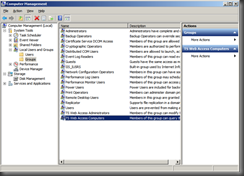
Now on the Connection Broker add the Web Access servers to the TS Web Access group. You can do this through Computer Management like above or you can do it using the RD Connection Manager.


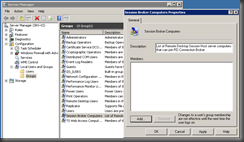
Add Session Hosts to Session Broker Computers Group on Connection Broker
Now we need to add our Session Hosts to a group to give them the ability to use the Connection Broker. Add them to the local group in Computer Management.
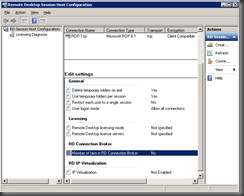
Configure Session Hosts to Use Connection Broker (RD1 & RD2)
Now all of our Session Hosts need to be configured to use the Connection Broker’s services. On each RDSH:


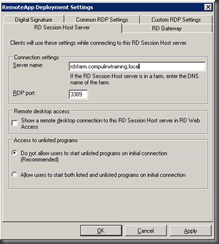
Configure RemoteApp to Connect to RD Server Farm
We need to provide the RD farm address so that clients will connect to it when running RemoteApps. On each Session Host:

Configure Connection Broker for RemoteApp Programs Source
Now it’s time to configure a RemoteApp source for the Connection Broker. On the Connection Broker :


Configure Web Access Servers to Use Connection Broker RemoteApp Source
If you have come this far your doing well! We need to make sure the Web Access Server is configured to use Connection Broker as the source for our RemoteApps. On each Web Access server :

Configuration of NLB
We now need to consider our method of initial load balancing. Remember, clients don’t talk to the RD Connection Broker role service directly; they connect to a farm, which sends this connection to the RD Connection Broker to let it find the right endpoint. So, the farm is connected to first (lets call it the initial connection) and then the connection broker, and then to RD Session Host server in the farm! We will use NLB as our method of load balancing the initial connection to the RDSH farm.
NLB distributes incoming connections evenly across each load-balanced server on the principle that if the incoming requests are evenly distributed, the traffic should be, too. NLB is best for load-balancing servers when the connections are very short, like web servers, or in this case, the initial connection in a farm that is participating in RD Connection Broker load balancing. NLB is more complicated to set up than RR DNS, but it’s capable of detecting when a server is no longer available and will not attempt to send connections to it.
To configure an NLB cluster, you need to complete the following steps.
As this is a test lab, I will not be installing a Licensing Server.
So, install the RDSH role on both servers and add ‘Domain Users’ to the local ‘Remote Desktop Users’ group.
RDSH Certificates Template
We now need to configure the RDSH servers to use machine certificates obtained from an enterprise CA. All servers involved in the provision of remote applications to connecting clients require machine certificates. Each server will obtain its own machine certificate from an Enterprise CA. This will be used for remote desktop connections. However, I have found that you will need to share a signing certificate amongst both RDSH and RDCB servers (this certificate originated from RDSH1). I will show you how to create a suitable certificate template on the CA which we will use to enrol a needed certificate on each RDSH server.
- On the Enterprise CA, under the Certificate Template Node, select Manage and duplicate a Web Server certificate. Select Windows 2008.
- Give the certificate an appropriate name.
- On the Security tab, ensure that all servers involved are placed on the security ACL tab with 'Read' and 'Enrol' permissions.
- On the Request Handling tab, ensure that the Allow Private Key to be Exported is selected
- On the Subject Name tab, ensure the Supply in the Request radio button is selected.
- Select the Certificate Template Node, right click and select New. Locate the duplicated certificate just created and ensure that it is listed in the Certificate Template list.

Now that you have created a new certificate template that will be used by the Remote Desktop servers, you should define revocation information on certificates your CA will publish. This is detailed in an earlier post (See Step 1 Configure Enterprise CA to Support AIA Extension to Support OCSP). This post will also explain the importance of OSCP in overcoming any revocation errors that you might receive when connecting externally.
The next logical step would be to obtain suitable machine certificates for the RDS servers.
Manually Obtain Machine Certificates on Your RDS Servers
Now that the RDS certificate template and the correct revocation settings have been made, you can now obtain the necessary machine certificates. Use the following procedure:
- On your RDS servers, log on as Administrator
- Type MMC in Run
- Select File, Add Remove Snap-in
- Under Available snap-ins, select Certificates and click Add
- Select Computer account and click next
- Select Local computer and click finish and click Ok
- On the Certificates snap-in, select the Personal node, right click and select All Tasks, Request New Certificate
- Click Next on the Before You Begin window and click Next again
- Select the certificate template created above and select the blue hyperlink
- Under the Subject tab type a suitable Common Name. If the certificate is to be used and sent externally (on the Internet) then you should use a public DNS name. Click Add.
- Under Alternative name, select DNS and add names corresponding to both public DNS and any private FQDNs. The DNS name should also include the name of the farm that you intend to use (plan wisely!). At this point, you should add the host record (mapping farm name to an IP address) to your internal DNS server. The IP address used will be the IP used for your NLB cluster (more on this later!)
- Under General tab, write a suitable name and description for the certificate.
- Under Private Key select make Private Key Exportable. You may need to copy the certificate to other servers at some point (that is certificate and private key)
- Click Apply and OK to finish the wizard
- You should repeat this procedure on both RDSH, RDCB servers and for the RDWA server (with suitable external and internal names).
Configuration of Remote Desktop Session Host Configuration and its Certificate (Do this on each RDS server)
- Select Admin Tools, RDS and then open Remote Desktop Session Host Configuration.
- Under Connections select RDP-TCP properties
- On the General tab you will probably find the Certificate is set to Default. Using the select key make sure you define the certificate you installed above.
To configure a certificate used to digitally sign the RDP file (Do this on both RDSH servers farm members)
I have found that it helps to use the same machine certificate across both RDSH servers and on the RDCB server. You will have to export the certificate with private key (therefore a .pfx file) from RDSH1 to RDSH2 and to RDCB. To export the certificate, just right click on the personal machine certificate in a MMC and select Export. Then import the certificate onto the other machines using a MMC once more. Once the certificate has been exported/imported you can now deal with configuring that certificate to digitally sign the RDP file.
First, configure a certificate used to digitally sign the RDP file by using RemoteApp Manager.
- Log on to RDSH1 as Domain\Administrator.
- Click Start, point to Administrative Tools, point to Remote Desktop Services, and then click RemoteApp Manager.
- Under the Overview section, click Change next to Digital Signature Settings.
- Select the Sign with a digital certificate check box.
- Click Change.
- On the Confirm Certificate page, select the appropriate certificate, and then click OK.
- Click OK to close the RemoteApp Deployment Settings dialog box.
Domain joined clients will automatically have the CA root certificates stored in their trusted root store. They will not need personal machine certificates only the trusted root certificate in order to validate certificates received from the RDSH servers.
Configure the RD Connection Broker server (RDCB server)
On a separate member server, install the RD Connection Broker role service. Import the digital certificate used by RDSH server to the Personal certificate store of the computer (remembering to import a PFX file). Then configure the imported certificate used to digitally sign the RDP file.- Open Remote Desktop Connection Manager. To open Remote Desktop Connection Manager, click Start, point to Administrative Tools, point to Remote Desktop Services, and then click Remote Desktop Connection Manager.
- Under the Virtual Desktops: Resources and Configuration heading, click Specify next to Digital Certificate.
- On the Digital Signature tab, select the Sign with a Digital Certificate check box.
- Click Select.
- In the Confirm Certificate dialog box, click the certificate that you want to use for signing the RDP files, and then click OK.
Configure the RD Web Access server (RDWA server)
On a separate member server, install the RD Web Access role service.You will need to obtain a certificate for this server like you obtained a certificate for the RDSH server from the Enterprise CA.Setting Up Authorization
A chain of authorization needs to be set up. The RDSH servers needs to authorize the RDCB and in turn the RDCB will authorize the RDWA server. You must add Web Access and Connection Broker Servers to TS Web Access Group on Session Host Servers (RDSH1 & RDSH2)
- On each of your RD Session Hosts go to Start > Administrative Tools > Computer Management.

- Open Local Users and Groups and select the Groups sub-folder on the left, then double click the “TS Web Access Computers” group in the center.
- Add the names of your RD Web Access and Connection Broker servers.
Now on the Connection Broker add the Web Access servers to the TS Web Access group. You can do this through Computer Management like above or you can do it using the RD Connection Manager.
- Go to Start > Admin Tools > Remote Desktop Services > Remote Desktop Connection Manager.

- On the Actions pane, click Add RD Web Access Server.

- Enter the FQDNs of any RDWA servers
Add Session Hosts to Session Broker Computers Group on Connection Broker
Now we need to add our Session Hosts to a group to give them the ability to use the Connection Broker. Add them to the local group in Computer Management.

- Add each RDSH server to the list
Configure Session Hosts to Use Connection Broker (RD1 & RD2)
Now all of our Session Hosts need to be configured to use the Connection Broker’s services. On each RDSH:
- Select Admin Tools, Remote Desktop Service, Remote Desktop Session Host Configuration.

- Double-click ‘Member of Farm in RD Connection Broker’ which is under ‘RD Connection Broker’

- Under the RD Connection Broker tab click the Change Settings button.

- In the resulting RD Connection Broker Settings window, you specify how this RD Session Host server will interact with RD Connection Broker—that is, what the relationship is. Choose Farm Member and then enter the RD Connection Broker server FQDN and the farm name in the input boxes (see above). You should use the FQDN rather than flat NetBIOS name. This name should be one of the subject names used in the certificate created.
- Click OK and you will be back on the RD Connection Broker Properties tab. The check box next to Participate in Connection Broker Load Balancing is selected by default. Leave it selected.
- The weight describes its capacity relative to the other RD Session Host servers in the farm. Although all RD Session Host servers should be configured identically, not all will necessarily have the same amount of
memory or the same number of processor cores. For example, if a server is only 75% as powerful as other servers in the farm, then you can reduce its weight to allow it only 75% as many connections as the other servers. The default value is 100.
- Also by default, the redirection method—how a client connects to the RD Session Host server once RD Connection Broker decides which server should accommodate the connection—is set to Use IP Address Redirection. If the initial load balancer allows clients to connect directly to RD Session Host servers in the farm, keep this default
setting. Unless you have a good reason, you should leave Use IP Address Redirection.
- In the bottom section of this page, select the IP address that will be used for reconnections to this server. NOTE If you have more than one network adapter that you want to use, you can choose them all by checking the box next to each network adapter.
- Perform this process for each member of the farm, taking care to use the same farm name and the same redirection method on all farm members.
Configure RemoteApp to Connect to RD Server Farm
We need to provide the RD farm address so that clients will connect to it when running RemoteApps. On each Session Host:
- Select Start, Admin Tools, Remote Desktop Services and RemoteApp Manager

- Next to RD Session Host Server Settings click Change.

- In the RD Session Host Server tab type the FQDN of the farm then click OK.
Configure Connection Broker for RemoteApp Programs Source
Now it’s time to configure a RemoteApp source for the Connection Broker. On the Connection Broker :
- Select Start Admin Tools, Remote Desktop Services, Remote Desktop Connection Manager.

- Click RemoteApp Sources in the left hand tree, then choose Add RemoteApp Source in the right Actions pane.

- Type the DNS name for the RD server farm then click Add.
Configure Web Access Servers to Use Connection Broker RemoteApp Source
If you have come this far your doing well! We need to make sure the Web Access Server is configured to use Connection Broker as the source for our RemoteApps. On each Web Access server :
- Select Start, Admin Tools, Remote Deskt0p Services, Remote Desktop Web Access Configuration.

- Supply Domain Admin credentials and sign-in.

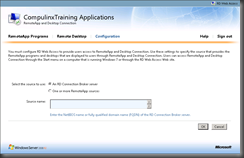
- Click the Configuration tab heading. Then for “Select the source to use:” choose “An RD Connection Broker server”. Then type in the Connection Broker server name in the “Source name:” field. Click OK. Remember, the RD Connection Broker server has been added to the TS Web Access Computers group on each farm member (RDSH1 and RDSH2).Also we have added the RD Web Access computer account to the TS Web Access Computers group on the RD Connection Broker.
Configuration of NLB
We now need to consider our method of initial load balancing. Remember, clients don’t talk to the RD Connection Broker role service directly; they connect to a farm, which sends this connection to the RD Connection Broker to let it find the right endpoint. So, the farm is connected to first (lets call it the initial connection) and then the connection broker, and then to RD Session Host server in the farm! We will use NLB as our method of load balancing the initial connection to the RDSH farm.
NLB distributes incoming connections evenly across each load-balanced server on the principle that if the incoming requests are evenly distributed, the traffic should be, too. NLB is best for load-balancing servers when the connections are very short, like web servers, or in this case, the initial connection in a farm that is participating in RD Connection Broker load balancing. NLB is more complicated to set up than RR DNS, but it’s capable of detecting when a server is no longer available and will not attempt to send connections to it.
To configure an NLB cluster, you need to complete the following steps.
- If you have a network adapter dedicated to NLB, you need to configure it with static IP and subnet mask
- Install the NLB Manager on a host node or other management machine. To do
this, open Server Manager and select the Features section. Click Add Features, select the check box next to Network Load Balancing, and click Install. - Configure the NLB cluster.
- Open NLB Manager on one of the farm members from Start, All Programs, Administrative Tools, Network Load Balancing Manager or by typing nlbmgr in the Run text box on the Start menu. Right-click Network Load Balancing Clusters and choose New Cluster.
- In the Host input box, enter the name of one of the NLB hosts (one of the RD Session Host server farm members) and click Connect. All available network adapters on that server show up in the lower pane. Select the NLB network adapter and click Next (I am using only a single adapter on each RDSH machine)
- The IP address and subnet mask assigned to the network adapter will show up in the next window. The priority number is a unique number that differentiates the servers. Accept the default value. If you need to make any changes to the address, click Edit and make your changes. Leave the Initial Host State as Started, and click Next.
- On the next screen, click Add and add a unique IP address and subnet mask that will be shared by all cluster members, and then click OK. When users request access to the farm, they will be sent to this address instead of a specific RD Session Host server. This is the ‘Cluster Address’
- On the Cluster Parameters page, accept the defaults, including Unicast for the Cluster Operation Mode setting, and click Next. All cluster host adapters must use the same operation mode or NLB will not function.
- On the New Cluster: Port Rules page, you need to make a few changes to the default settings. Click Edit, and then change the starting and ending port range to 3389 (in both the To and From fields) because you will be using this cluster to load-balance RDP traffic only. In the Protocols section, select TCP. In the Filtering Mode section, choose
Multiple Hosts to allow multiple hosts to handle traffic for this port rule. For Affinity, you have three choices; none, single and network. Choose Affinity: None so that incoming connections can be sent to any member of the farm. (There’s no reason to set affinity when the connections are being redirected, and doing so could make your load-balancing efforts useless by sending repeated connection requests to the same server.)
4. Add a DNS entry mapping the farm name to the cluster IP address.


