Pages

Showing posts with label Exchange 2010. Show all posts

Wednesday, 24 August 2011

Move Arbitration Mailboxes In Exchange 2010

Quite simple really. I have found that in certain situations, (help in backup) I have needed to delete databases (perhaps several databases exist on a single drive). You can move mailboxes from one database to another simply by typing the following cmdlet:

[PS] Get-Mailbox –Database TheDatabaseID  | New-MoveRequest –TargetDatabase TheDatabaseID

Now this will move the ‘regular’ mailboxes but not those marked as arbitration mailboxes. You can identify those by using the following:

[PS] Get-Mailbox –Database TheDatabaseID –Arbitration

Now you know what mailboxes to look out for, move them to the database of preference.

[PS] Get-Mailbox –Database TheDatabaseID –Arbitration | New-MoveRequest –TargetDatabase TheDatabaseID.

And then check that the arbitration mailboxes have been moved to an alternative database. You can also check out the move requests themselves:

[PS] Get-MoveRequest

Now that the mailboxes (hidden ones included) have been moved, try deleting the database now. It should work but remember that you will still have to remove the database files manually.

For Matt and Mark!

Sunday, 21 August 2011

Exchange 2010 MountDial

The setting is set per server. You can determine the value on your server by typing the following cmdlet:

[PS] Get-MailboxServer | FL Name,AutoDatabaseMountDial

MountDial determines if a passive copy of a DAG can automatically come online based on how many log files being copied to it. If you run the above command, you will see one of several values for AutoDatabaseMountDial including:

  1. BestAvailability
  2. GoodAvailability
  3. Lossless

These mean the following:

BestAvailability

If you specify this value, the database automatically mounts immediately after a failover if the copy queue length is less than or equal to 12. The copy queue length is the number of logs recognized by the passive copy that needs to be replicated. If the copy queue length is more than 12, the database doesn't automatically mount. When the copy queue length is less than or equal to 12, Exchange attempts to replicate the remaining logs to the passive copy and mounts the database.

GoodAvailability

If you specify this value, the database automatically mounts immediately after a failover if the copy queue length is less than or equal to six. The copy queue length is the number of logs recognized by the passive copy that needs to be replicated. If the copy queue length is more than six, the database doesn't automatically mount. When the copy queue length is less than or equal to six, Exchange attempts to replicate the remaining logs to the passive copy and mounts the database.

Lossless

If you specify this value, the database doesn't automatically mount until all logs that were generated on the active copy have been copied to the passive copy.

BestEffort

This will mount no matter the copy queue length. Be careful with this setting as you could loose a lot of mailbox data!


To manually switch from passive to active type the following cmdlets:

[PS] Move-ActiveMailboxDatabase DB4 -ActivateOnServer MBX3 -MountDialOverride:None
As the MountDialOverride property is set to ‘none’ whatever is currently set (probably the default) remains. 
The default on my server is GoodAvailability. So, replace none with one of the three options listed above to change this.
Read an earlier post regarding DAGs 
Ref.

Saturday, 20 August 2011

How to Export Exchange 2010 Queues

You can use the Shell to export messages from a queue on a computer that has the Microsoft Exchange Server 2010 Hub Transport server role or the Edge Transport server role installed to a specified file path. You can't use Queue Viewer to perform this task. However, you can use Queue Viewer to locate, identify, and suspend the messages before you perform this task.

Messages that get ‘stuck’ in a queue can be exported to a folder and you can later resubmit the messages once you fix the mail flow problem. To export a message (or all messages in a queue) you should first suspend the queue. Suspension does not prevent messages entering the queue, but it will stop them leaving. The following cmdlet suspends the queue.

[PS] Get-TransportServer | Get-Queue

This command will show you the queues on your transport servers (you may have more than one in your site).

You might have an example where your messages are failing to be sent because of name resolution:


q1


You can see that the DeliveryType is set to DNSConnectorDelivery. The messages are queued for delivery to an external recipient by using an SMTP connector that's located on the local server and that's configured to use Domain Name System (DNS) for routing resolution.

To export the messages, first suspend the queue:

[PS] Suspend-Queue –Identity SRV1\20

Now that the queue is suspended you suspend the messages.

[PS]Get-Queue -Identity srv1\20 | Get-Message -ResultSize unlimited | Suspend-Message –Confirm:$False

-ResultSize unlimited is used as the default is set to 1000.

Now the messages are suspended you can export them. To see the list of messages in the queue type the following:

[PS] Get-Queue -Identity srv1\20 | Get-Message -ResultSize unlimited

The status should show the messages are suspended and you should see the Email subject heading and from address. Notice how the message ID is created and includes the Queue ID.

Now to export a single message:

[PS] Get-Message -Identity srv1\20\75 | AssembleMessage -Path c:\exportfolder\email1


To export all the messages from the queue is a bit more complicated. Try the following:

  • [PS] $array = @(Get-Message -Queue srv222\20 -ResultSize unlimited)
  • [PS] $array | ForEach-Object {$i++;Export-Message $_.Identity | AssembleMessage -Path ("c:\exportfolder\"+ $i +".eml")}

The above cmdlets will produce .eml files in c:\exportfolder\ with names like 1.eml, 2.eml. At a later stage you can ‘import’ the messages back into the submission queue by using the replay directory. The Replay directory receives messages from foreign gateway servers and can also be used to resubmit messages that administrators export from the queues of Exchange 2010 servers. Read this post for more.

Friday, 12 August 2011

Role-Based Access Control (RBAC) Exchange 2010 Legal Hold and Discovery Search

RBAC can be used to allow administrators to perform a specific exchange task by being assigned a management role that has permissions to perform the task. Administrators can be assigned these roles directly, or multiple roles can be grouped together into management role groups. Management role groups are infact AD universal security groups. As you will see however, Exchange administrators should NOT be added to these groups using AD tools directly!

Each management role consists of management role entries. A management role entry is an EMS cmdlet or a script that users in a management role can execute.

For a list of management roles, type the following cmdlet:

[PS] Get-ManagementRole | Get-ManagentRoleEntry

The list you will see has quite a few roles!

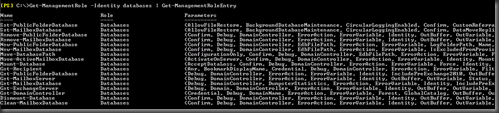
If you take just one role for example, say ‘databases’ you will begin to see what's involved:

[PS] Get-ManagementRole –Identity Databases | Get-ManagementRoleEntry
mr1

So, users are assigned a management role (that can execute scripts that are defined by management role entries) by being assigned to a management role group. This can be very useful. For example we can create a management role group that only allows users to create exchange recipients. After we create the group and add users, management role(s) are then assigned to the group.

Several role groups exist in Exchange 2010 by default.

[PS] Get-RoleGroup

mr2

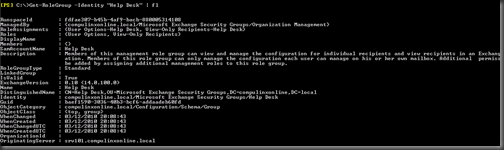
If we take a single role group for example ‘Help Desk’

[PS] Get-RoleGroup –Identity “Help Desk” | fl

The will list associated parameters for this group.
mr3

As you can see from the above screenshot, the roles assigned to the Help Desk management role group are shown. These are ‘User Options’ and ‘View Only’. You can also see under role assignments that it shows that these roles are assigned to help-desk! These default role groups can be found in AD in the Microsoft Exchange Security Groups

To add users to the role group of Help Desk use the following cmdlet:

[PS] Add-RoleGroupMember –Identity “Help Desk”  -Member “Andrew Stevens”

This will add Andrew Stevens to the Help Desk role group. To determine the membership of the management role group try the following:

[PS] Get-RoleGroupMember -Identity "Help Desk"

This is great if the Help Desk group has the needed management roles assigned to it. From the screenshot above this includes management roles of “User Options” and View-only Recipients”.

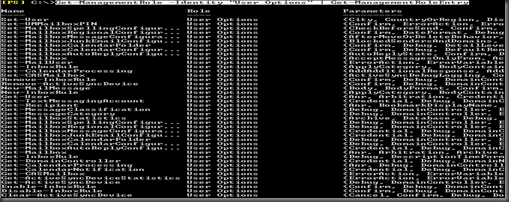
User Options is a management role with the following management role entries, determined by typing the following:

[PS] Get-ManagementRole -Identity "User Options" | Get-ManagementRoleEntry
mr4

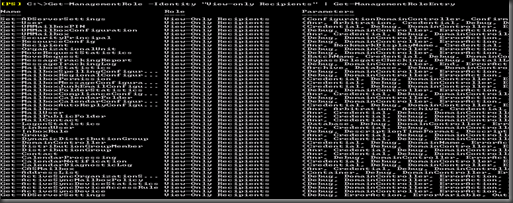
View-Only Recipients is a management role with the following management role entries, determined by typing the following:

[PS] Get-ManagementRole -Identity "View-only Recipients" | Get-ManagementRoleEntry
mr5

So you can see what Andrew Stevens can do having been placed in the Help Desk group.


You can also customize a role group to contain the roles that you need if you find the default roles assigned to a group do not fit correctly. If you find yourself changing the roles assigned to the default groups beyond recognition you might as well create a new group.

So, to add a role to an existing group try the following:

[PS] New-ManagementRoleAssignment -SecurityGroup "Help Desk" -Role "MailBox Import Export"

Now type the following again to determine the roles now ‘held’ by the Help Desk group:

[PS] Get-RoleGroup –Identity “Help Desk” | fl

You will notice that the RoleAssignments has changed to include Mailbox Import Export!

To remove the assignment type the following:

[PS] Remove-ManagementRoleAssignment -Identity "Mailbox Import Export-Help Desk"

If you need to you can create a role group from scratch. Lets create a role group called London Help Desk and assign roles to the group:

[PS] New-RoleGroup "Help Desk London" -Roles "User Options","View-Only Recipients"

Try the Get-RoleGroup cmdlet and you should see it listed.

So far the London help Desk team have the role of View-Only recipients and User Options. This is no different to the default Help Desk assignments. However you can add to it

[PS] New-ManagementRoleAssignment -SecurityGroup "Help Desk London" -Role "MailBox Import Export"


Legal Hold

An interesting role is Legal Hold. A legal hold in Exchange 2010 will keep e-mails even if the user tries to delete them. Note, the user will think the e-mail is deleted. The only way to actually see the e-mails is by doing a discovery search, and opening the discovery mailbox.

The legal hold role has the following assignments:

[PS] Get-RoleGroup | Where-Object {$_.roleassignments -match "Legal Hold"}

The output will show you that both Organization and Discovery Management groups have this role by default.

To grant our London Help Desk team Legal Hold type the following cmdlet:

[PS] New-ManagementRoleAssignment -SecurityGroup "Help Desk London" –Role “Legal Hold”

Type the following cmdlet for confirmation:

[PS] Get-RoleGroup | Where-Object {$_.roleassignments -match "Legal Hold"}

You should now see Help Desk London listed.

To turn this feature on we need to enable it for specific mailboxes. First you must have the role to do so. As mentioned, those in the Organization Management (and Discovery Management) have the Legal Hold role assigned. If you are doing this as a Domain Administrator then you are a member of Organization Management already.

[PS] Get-RoleGroup -Identity "Organization Management" | ft name,members

Now, determine which recipients you wish to define Legal Hold to and type the following:

[PS] Set-Mailbox –Identity “A User” –LitigationHoldEnabled $True

To check to see which mailbox has been enabled, type the following cmdlet:

[PS] Get-Mailbox  | ft name,lit* –au


Performing a Discovery Search

You can still find and open the deleted emails using a discovery search. A discovery search can be made against any organisation mailbox (not just those on litigation hold). Here’s what happens:

  1. User deletes a message.
  2. The message moves to a 'Deleted Items' folder. At this point the user can see the deleted messages and can move the deleted message back to the inbox. This is known as a 'soft delete'. Messages can also be moved to the 'dumpster' by emptying the deleted items folder.This is a 'hard delete'.
  3. Message moves to the 'Dumpster'. This removes the message from view. Deleted item retention is 14 days by default. Users can still recover items by using the recover deleted items tool (right click deleted items in OWA and select 'recover deleted items')
  4. If the end user purges data from the "Recover Deleted Items" view (hard delete from the Recoverable Items\Deletions folder), the item will be moved to the Recoverable Items\Purges folder. The purges folder is a special folder that sits within the dumpster. The user will not be able to see the deleted message from this folder. However administrators granted the rights to perform 'discovery searches' can search through the purges folder and restore deleted items.

Enabling Litigation Hold means that items never will be purged from the “Purges” subfolder, which of course results mailboxes growing considerably in size over time!

To perform a discovery search perform the following steps:

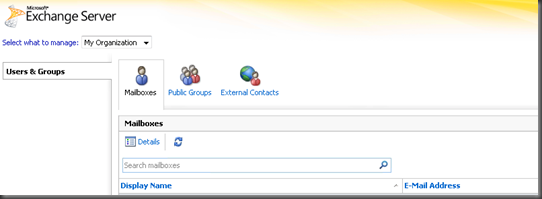
1. Perform a discovery search for the item you need to restore. This first involves navigating a browser to https://servername/ecp. This is on the CAS role (ecp is the exchange control panel). In Figure 1, the user ‘Al Pacino’ is in the LegalAdmins role group. This group has been assigned the roles ‘User Options and View-only Recipients’ (which is the same as the default Help Desk role). At this point Al cannot perform a discovery search and this is his ECP view (only Users & Groups). 
mr6

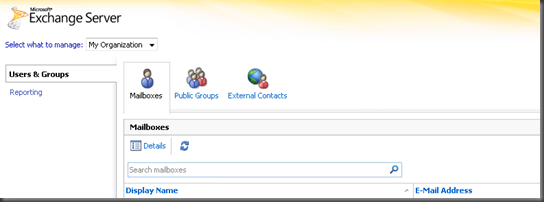
2. Assign the Mailbox Search role to the LegalAdmins group using the following cmdlet: [PS] New-ManagementRoleAssignment -SecurityGroup LegalAdmins -Role "Mailbox Search"
mr7

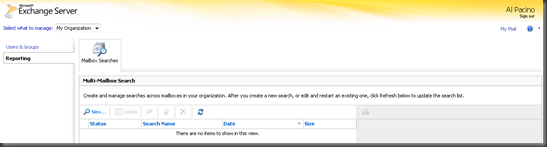
3. The above screenshot shows us the ECP view after applying this step. You can now see that the ‘Reporting’ link is shown. Select this link.
mr8

4. After you select this link you should see a similar view as shown above. Remember that you can also add a user to the Discovery Management role group instead of creating a group and assigning roles to it.

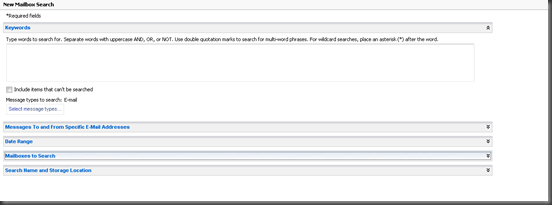
Select 'New'.
m11

5. As you can see there are a number of search methods. Select mailbox to search and select the user mailbox that has purged deleted items.

6. Provide a search name

7. Select 'Select a mailbox in which to store the search results' and choose the 'Discovery Search Mailbox' and click save.

8. After the search has completed (you may have to refresh) select the link that says open by the results output on the right hand side.

9. If you cant open the discovery search mailbox, you will need to grant the user access to it by typing in the following:

[PS] Add-MailboxPermission DiscoverySearchMailbox -User al -AccessRights FullAccess
NB. I changed the alias of the mailbox to this simpler name

10. You should now be able to open the discovery search mailbox. Once opened, navigate on the left to the search name and open the sent\deleted items folder. You should be able to find the item that was purged.

NB. If you wish you can create a new discovery search mailbox by using the following cmdlet:

[PS] New-Mailbox "HelpDeskDiscovery" -UserPrincipalName HelpDeskDiscovery@yourcompany.com –Discovery.

[PS] Add-MailboxPermission HelpDeskDiscovery -User al -AccessRights FullAccess


In the above example, our test user Al, can perform the discovery search and open the discovery search mailbox to find deleted items.

Wednesday, 3 August 2011

Cannot Uninstall Exchange 2010 Because of Arbitration Mailboxes

To list the arbitration mailboxes type the following command:

[PS] Get-Mailbox –Database database name  -Arbitration

This will list all the mailboxes that can be moved or removed.

To move them to another database, type the following command:

[PS] Get-Mailbox -Arbitration -Database db1 | New-MoveRequest -TargetDatabase db2

To remove the mailboxes, type the following command:

[PS] Get-Mailbox -Arbitration -Database db1 | Remove-Mailbox -Arbitration –RemoveLastArbitrationMailboxAllowed

Once you do this hopefully you should be able to uninstall Exchange using the Control panel

Tuesday, 31 May 2011

FPE and FOPE ?

Check out this webcast that describes what Exchange provides in terms of anti-spam and anti-virus and how Forefront Protection for Exchange (FPE) and Forefront Online Protection for Exchange (FOPE) improves things.

Click here! 

FPE homepage


FOPE homepage


Saturday, 28 May 2011

Don't put CAS in the Perimeter network!

The following link provides a good read on why Microsoft does not support putting your CAS servers in the DMZ. Well Done Exchange Team!

http://blogs.technet.com/b/exchange/archive/2009/10/21/3408587.aspx

Monday, 15 March 2010

Exchange 2010 and Backups Pt. 3

Restoring Databases, Mailboxes and Deleted Messages
In Part 2 I described how to perform a backup (as opposed to using DAGs). Now its time to consider recovery. At some point you will want to perform the following types of data recovery:

  • Entire mailbox databases
  • Individual user mailboxes
  • Single items in a mailbox
We will now look at these different scenarios
Recovering Databases with the Windows Server Backup Tool
A good visual walk-through on how to restore the database from backup is provided by the following link Database Restoration.
The following link provides a complete breakdown of WBAdmin commands WBAdmin Commands
and the recovery details are provided with this link WBAdmin Recovery Details
Recovering Mailboxes
Mailboxes can be recovered in the following ways:
  1. Using the deleted mailbox retention
  2. Using a recovery database
  3. Using a lagged database copy
    1. Using the Deleted Mailbox Retention
    When a mailbox is removed from a database, it becomes disconnected from its active directory account. The disconnected mailbox stays disjoined for a period of time determined by the databases retention time (30 days by default). The act of removing  the mailbox will actually remove the active directory account from AD database. So, if you want to reconnect the mailbox back to the original AD account you will first have to bring the user 'back from the dead' perhaps by using the LDP tool. The general steps involve:
    • Use the LDP tool to bring the deleted user object back from the deleted containers object
    • Reconnect the mailbox with the original account (or another account if you prefer)

    Of course this has to be done within thirty days of mailbox deletion. To determine which mailboxes are in a disconnected state type the following:

    [PS] Get-MailboxStatistics -Server servername | Where-Object {$_.DisconnectDate -ne $null} | fl dis*,*guid

    This will display all disconnected mailboxes, when they became disconnected and just for fun the mailbox GUID numbers. You can use the GUID identifier or the displayname to reconnect the mailbox:

    [PS] Connect-Mailbox 46d34411-1c85-4f49-8772-7d8572a4dd1d -Database db2 -User "Rodica Woodcock" -Alias Rodica

    As I mentioned, this has to be done within the 30 day retention time. You can extend this time if you wish by typing in the following cmdlet:

    [PS] Set-MailboxDatabase DB2 -MailboxRetention 60.00:00:00

    This command will extend the retention time by another 30 days to a total of 60 days

    2. Using a Recovery Database
    How would you recover a mailbox if the mailbox retention time has been exceeded? To do this you can create something called a recovery database. This is like a regular database but users cant access it with client software. Also mail cannot flow to and from a RDB nor can policies be applied to it.
    The overall steps involve the following:

    1. Create a RDB
    2. Restore the normal database from backup
    3. Point the RDB to the location of the restored backup and mount it
    4. Restore the mailbox that was deleted

    1. How to Create a Recovery Database (RDB)

    [PS] New-MailboxDatabase RDB1 -Server srv215 –Recovery

    2. Restore the Database From Backup
    Refer back to the proceedure outlined above to do this. NB. You should restore the database to an alternate location. It is also suggested that you should repair the database (in case of corruption). The following command refers to a restored database to the alternative location of e:\rdbrestore. You must provide the full path to the .edb file

    [PS] eseutil /p E:\rdbrestore\E_\db2\db2.edb

    3. Point the RDB to the Restored Location

    [PS] Move-DatabasePath RDB1 -EdbFilePath E:\rdbrestore\E_\db2\db2.edb -LogFolderPath E:\rdbrestore\E_\db2 –ConfigurationOnly

    4. Mount the RDB

    [PS] Mount-Database RDB1

    Once mounted the recovery database can be used to recover a deleted mailbox. You do this with the Restore-Mailbox cmdlet.You will first need to enable the mailbox. If you removed the mailbox in practice, then the user account will have been deleted. Recreate the user in AD and then enable the mailbox.

    3. Using a Lagged Database Copy

    This involves replicating transaction logs to a passive database, waiting a specified amount of time and then replaying them into that copy. Since you build a delay into this model, when you recover from the copy you might incur some data loss since you will be deleting transactions that are valid.

    The maximum lag time you can use is 14 days. To set a replay lag time of 7 days use the following cmdlet:

    [PS] Set-MailboxDatabaseCopy SRV2\DB01 –ReplayLagTime 7.0:00:00

    To recover from a lagged database copy, perform the following main actions:

    • Suspend replication to the lagged copy (pausing database replication)
    • Take a VSS snapshot of the volume that holds this copy
    • Figure out the date/time you want to restore the database to and delete all transaction logs after that time
    • Repair the database using ESEUtil
    • Recover the data from the database
    • Restore the VSS snapshot of the volume
    • Resume replication to the lagged copy

    Saturday, 6 March 2010

    Exchange 2010 and Backups Pt 2

    Using Windows Server Backup with Exchange 2010
    Exchange 2007 running on Server 2008 was not a happy marriage. Support for native exchange backups was removed. However here comes Exchange 2010 and with it the Microsoft Exchange Service Extension which allows you to backup up Exchange using Server 2008 Windows Server Backup. While the situation has improved (at least a backup is possible!) using Windows Server Backup has its limitations:
    • Only full volumes can be backed up. This means only the whole, complete volume can be backed up. You cannot make independent backups of a database or logs files. Only the volumes these files reside on can be backed up. Because of this, both .edb and log files for any particular database must be available together in the same backup set inorder to restore the data.
    • You cannot perform remote backups
    • In order for log files to be trucated only full backups can be made
    • All of the databases that are in your backup set will be restored. You cannot restore a single database if your backup set holds multiple databases.
    • Only an active copy not passive copies of the database can be backed up 
    Using WBAdmin to Perform Manual and Automated Backups
    So, the first thing to do is to install the backup feature to your Server 2008 server:

    [PS] ServerManagerCMD -i Backup-Features

    Once the feature has been installed, you can perform a one-time backup using the following:
    This link will provide a good visual to the process using the GUI.

    how-to-backup-exchange-2010

    The following will create a full backup to a network share. Note the use of -vssFull which should be used. Performs a full backup using the Volume Shadow Copy Service (VSS). Each file's history is updated to reflect that it was backed up. If this parameter is not used WBADMIN START BACKUP  makes a copy backup, but the history of files being backed up  is not updated.

    [PS]  wbadmin Start Backup -backuptarget:\\ServerName\ShareName -include:c: -user:domainname\administrator -password:AccountPassword -vssFull

    If you need to perform a scheduled backup you could try the following procedure. Note that the GUI wizards will only allow you to schedule backups to locally connected drives, USB drives/sticks and firewire. You can't backup to NAS drives. So how do you do it?
    1. Save the above command line as a batch file
    2. Schedule the script to run using the Windows Task Scheduler (found in Admin Tools). Create a basic task and end of the wizard ensure that in the task properties select Run whether the user is logged on or not, and check the Run with highest privileges checkbox. Also ensure that the user that the task is running as is an Administrator or part of the Administrators or Domain Admins group.
     

      Exchange 2010 and Backups Pt 1

      It has been argued that backup management in Exchange 2010 has changed dramatically. With the implementation of DAGs, replica databases and effective log shipping and replaying the need for database backup has disappeared. Apparently since moving onto Exchange 2010, Microsoft have eliminated the need to maintain data backups. Does this sound a little scary? Well consider the following and make your own mind up:
      • Server Failure Add mailbox servers to a DAG and replicate databases to other servers in the DAG
      • Disk Failure Place the edb file and log files on the same disk and ensure the database is replicated to at least three DAG members
      • Database Corruption If a database goes bad you can set the ReplayLagTime so that copies of the database do not incorporate any dodgy transaction logs that caused the corruption on the active master. See this post. 
      • Single Message Recovery This is an important consideration but easy to solve. Exchange now has single item recovery built in. You need to enable it and specify how long you want to keep deleted items for. 
      • Mailbox Recovery Deleted mailboxes are maintained for 30 days by default which can be configured to be longer if required
      • Site Failure You should stretch your DAG to include subnets in different sites.
      One thing you would consider doing if going for a DAG based backup solution, is using circular logging. This will help keep the log sizes down (which would normally get truncated with 'normal' backups).
       
      To enable circular logging of your log files, type in the following:

      [PS] Set-MailboxDatabase DB01 -CircularLoggingEnabled $True

        Wednesday, 3 March 2010

        Redundency of Exchange 2010 Client Access Servers

        The redundency method used with CAS is Network Load Balancing or NLB. The cluster of up to 32 servers is called a client access array. Broadly speaking the three steps involved in creating an array are:
        1. Install the NLB feature
        2. Create the NLB cluster
        3. Configure the client access array in Exchange 2010 
        It should be noted that if a CAS is also hosting a mailbox server role which is in a DAG, the CAS cannot be part of a DAG.

        To install the NLB feature on your CAS servers type the following:

        [PS] ServerManagerCmd -I NLB

        To create the NLB cluster on Server 2008 perform the following steps:
        1. Log in at a CAS
        2. Launch NLB Manager from Administrative Tools
        3. Choose Cluster, New to start a new cluster wizard
        4. On the Connect screen type in the IP address or FQDN of a CAS that will be in your CAS array. Try typing in the name of this CAS server, and click Connect.
        5. You may see two NICs listed. Select the NIC that is used for sending/receiving client access traffic
        6. On the Host Parameter screen, select the priority of the host. 
        7. On the Cluster IP Address screen, click the Add button to add the IP address of the cluster. In the Add IP Address dialog box, type the IP address, mask and click OK.
        8. On the cluster Parameters screen, type the FQDN of the cluster, e.g. nlb.yourdomainname.com.
        9. In the cluster operation mode select multicast mode.
        10. On the Port Rules Screen, select the port rule with the start port of 0 and the end port of 65535 and click the edit button
        11. In the Add/Edit Port rule dialog box, change the Port Range From value 1024,and click OK. What does this do? Well, it will modify the load balancing port range to include the dynamic ports that can be assigned by the RPC endpoint mapper. 
        12. Add another rule and set the from and to values to 135 using TCP. This makes sure that the RPC endpoint mapper is load balanced as well.
        13. You will need to add any other ports that are to be load balanced by the CAS array. This of course will mean adding port 80, 443 (and ports for IMAP and POP3 but we will not be testing these services).
        14. Click Finish to create the NLB cluster with the first node added.
        15. Now the cluster has been created you will have to add the other nodes. Right click the cluster and select Add Host to Cluster from the Menu.
        16. Type the FQDN of the CAS server you wish to add
        17. Like before, select the correct NIC
        18. Provide a priority number but you do not need to adjust the port rules.
        19. Finish to close the wizard. 
        20. It may take some time before the CAS NLB cluster fully converges. Don't worry. It will!
        Now the NLB cluster has been created, in step three we configure the CAS array. 

        The CAS array involves creating a site linked object in Active Directory. This means that all CAS servers in a particular site will be in this array. Mailbox servers will be logically tied to this array by virtue of their 'RpcClientAccessServer' attribute on the mailbox database. Remember this attribute on the database will reference the RpcClientAccess service running on the CAS servers which you just network load balanced. The attribute will point to the cluster which of course consists of at least 2 CAS servers.  

        To create the CAS Array object and to assign it to your London site type the following:

        [PS] New-ClientAccessArray -FQDN nlb.compulinxtraining.com -Site London

        Thats it! Pretty simple really. However, we have the DB01 database created before the creation of the CAS array. This database will point to the CAS server before the creation of the NLB cluster. Try the following to determine this:

        [PS] Get-MailboxDatabase DB01 | fl Name,RpcClientAccessServer 

        This should display exactly which CAS server the database is currently looking at. To change it type the following:

        [PS] Set-MailboxDatabase DB01 -RpcClientAccessServer nlb.compulinxtraining.com

        So, thats how you configure redundency for CAS servers. Build an NLB cluster, build a CAS array object and then assign your database to use this object. Remember that any new databases will be tied to this array automatically.

        Saturday, 27 February 2010

        Exchange 2010 Performing Database Management Pt3

        Manage Database Settings
        • Configure Exchange Search
        • Configure Database Size Limits
        Configuring Exchange Search
        Exchange Search creates a full text index on mailbox databases allowing users to search their email very quickly. Items are added to the index as they arrive so the index is always up-to date.

        This feature can be enabled or disabled on a per database or server manner.

        The following disables indexing on a per database basis,

        [PS] set-mailboxdatabase DB01 -IndexEnabled $False

        The following disables the indexing of all databases on the server,


        [PS] stop-service MSExchangeSearch

        [PS] set-service MSExchangeSearch -StartupType Disabled
        You should remember that although you can disable exchange search its probably not a good idea to. The 'discovery' feature (I will come to this) relies on it being enabled.

        You may have to rebuild the index when you are recovering from data loss. A script is included to help out which can be found in the following location:

        program files\microsoft\exchange server\scripts\resetsearchindex.ps1

        The following will rebuilds the index on a database

        cd "c:\program files\microsoft\exchange server\scripts\resetsearchindex.ps1 -Force DB01

        Configure Limits on a Database

        You can set a size limit on your database and if reached the database is dismounted. Exchange Server standard ed. has a default limit of 50 GB and the enterprise ed. does not have one. However a limt can be established and you can change the 50 GB limit the standard ed. imposes to a higher value. To do this open the registry using regedit and browse to the following path:

        HKEY_LOCAL_MACHINE\SYSTEM\CurrentControlSet\Services\MSExchangeIS\NameOfSever\PrivateDatabaseGUID

        The GUID can be found by using the following cmdlet

        [PS] Get-MailboxDatabase DB01 | ft name,GUID -au

        Look for the registry value 'Database Size Limit in GB'. If it exists change it to a value you require. If not create a new DWORD (32 bit) value by the same name.

        Thursday, 25 February 2010

        Exchange 2010 Performing Database Management Pt2

        With the database created in Pt1, we can now perform the following management tasks
        1. Configure an Online Maintenance Window
        2. Change the Timing for Database Checksumming

        1. Configure an Online Maintenance Window

        Exchange will perform several tasks to clean up the data in the database. Exchange defragmentation, database compaction and database contiguity maintenance. Because this occurs all the time we no longer need downtime to perform these tasks on a offline database.

        Online Maintenance (OLM) of the database occurs every night for 4 hours. By default this begins at 1.00AM but can be changed to suit your requirements. Remember that OLM does not include Online Defragmentation (OLD). This process occurs in the background. In Exchange 2007, OLD was part of the OLM and added alot of time to the OLM process. OLM includes the following processes
        • Cleanup (deleted items/mailboxes).Cleanup also happens during OLD.
        • Space compaction. The database is compacted and space is reclaimed at run time.
        • Maintain Contiguity The database is analysed for contiguityand space at run time and defragmented in the background.
        • Database Checksum This runs against both active and passive copies of a database. Checksumming can occur within an OLM schedule or as a background process similar to OLD
        The schedule or window of maintenace can be set in the following way

        [PS] set-mailboxdatabase DB01 -MaintenanceSchedule "sat.1:00 AM-sat.5:00 AM"

        This sets maintenance to be switched on at 1:00 am on Saturday and off at 5:00 AM

        2. Change the Timing for Database Checksumming

        As mentioned this can run within OLM or in the background. The background is the default but this can be changed to the OLM in the following way

        [PS] set-mailboxdatabase DB01 -BackgroundDatabaseMaintenance $False


        Exchange 2010 Performing Database Management Pt1

        Databases are at the heart of information storage in Exchange. Two types of database are considered:
        1. Mailbox
        2. Public Folder

        Microsoft have de-emphasized the use of public folder DBs in favour of sharepoint so I will focus mainly on mailbox DBs.

        Write-Ahead Logging
        Data is written to and read from the database using the Extensible Storage Engine (ESE). Its purpose is to allow applications to store and retrieve data via indexed and sequential access. Data is not written to the database directly, but holds the data in RAM and writes it to transaction logs first. The data in memory and the transaction logs are then written to the database periodically. This is write ahead logging. Essentially changes to data files (where tables and indexes reside) must be written only after those changes have been logged - that is, when log records have been flushed to permanent storage. When we follow this procedure, we do not need to flush data pages to disk on every transaction commit, because we know that in the event of a crash we will be able to recover the database using the log. Any changes that have not been applied to the data pages will first be redone from the log records (this is roll-forward recovery, also known as REDO) and then changes made by uncommitted transactions will be removed from the data pages (roll-backward recovery, also known as UNDO).

        Creating a New Mailbox Database
        Unlike previous versions of Exchange, the mailbox database has moved up to a global (or organizational) level. This means that the database has to be carefully (and uniquely) named. Because databases can be replicated between servers (this will be discussed at length later) you should not name the database after the server on which the database is housed.


        [PS] new-mailboxdatabase DB01 -edbfilepath "D:\DB01.edb" -logfolderpath "E:\DB01Logs"

        Unlike creating the database in the console, when created with the shell you need to mount the database.

        [PS] mount-database "DB01" (Use the dismount cmdlet to dismount the database!)
        Although you have specified the file path for the new database you can change the path by moving the database.

        [PS] move-databasepath "DB01" -edbfilepath "F:\DB01\DB01.edb" -logfolderpath "F:\DB01 -force

        (this parameter will bypass the prompt to first dismount the database).

        You should make note that you cannot move database files if they exist as copies on other exchange servers. You must first remove the replicas on those servers, move the database to the new path as shown above and then re-create the replicas.