Before you setup the VPN server you should sort out your certificates.If you have a Stand Alone Root CA the following post will help (I hope!)
Add the CA role using Server Manager. As mentioned the first thing to obtain on the VPN server is a server authentication certificate from the CA. You can do this using a variety of methods including these. Included is the following:
Using the Certificate Enrollment wizard with a standalone CA
1. In the Computer Certificates snap-in, right-click the Personal folder, point to All Tasks, point to Advanced Operations, and then click Create Custom Request.
2. Click Next
3. Click Proceed without enrollment policy, and then click Next.
4. In the Template field select No Template (Legacy Key) and For Request format, click either PKCS #10 or CMC. PKCS #10 is generally accepted by all CAs.

5. Click Next
6. Click the Details arrow, and then click Properties. You will need to configure all the certificate request options so that the issued certificate will be suitable for TLS/SSL.

7. On the Extensions tab click the Key usage arrow. In the Available options list, click Digital signature, and then click Add. Click Key encipherment, and then click Add.

8. Click the Extended Key Usage (application policies) arrow. In the Available options list, click Server Authentication and Client Authentication, and then click Add.

9. On the Private Key tab, click the Cryptographic Service Provider arrow. Because we selected the Legacy key in step 4 above, the Microsoft RSA SChannel Cryptographic Provider is enabled.
10. Click the Key options arrow. In the Key size list, select a key size. If desired, select the Make private key exportable check box. Do not select either the Allow private key to be archived or Strong private key protection check box.

11. Click the Select Hash Algorithm arrow. In the Hash Algorithm list, select the desired hash algorithm. E.g SHA-1

12. Click OK and then click Next
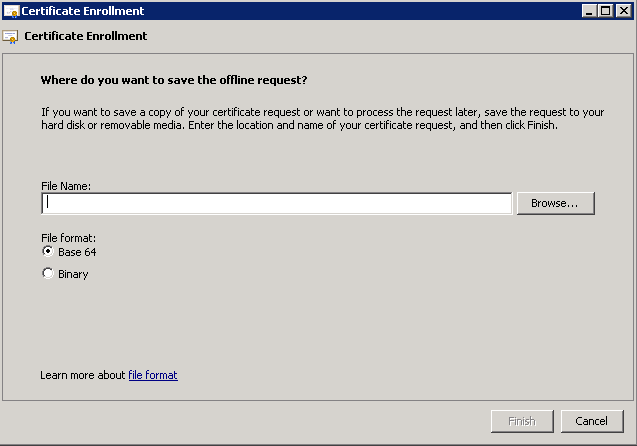
13. Enter a path and file name indicating where the request file will be saved and select Base 64 format and click Finish

Next, submit the certificate request and complete certificate enrollment by using Certreq.exe
1. Open a command prompt
2. Type certreq -submit -config <CertificateRequest.req>
E.g certreq -submit -config srvXYZ\CompulinxCARoot c:\VPNCertReq
This should return a RequestID. The request for your certificate will need to be issued by the CA administrator (the request will be found in the Pending Request folder. Simply right click the request and issue it).
3. Type certreq –retrieve -config and press ENTER. Where the CertificateResponse is the name given to the certificate you get back from the CA and will be placed in the directory you run the command from in command prompt
E.g certreq -retrieve -config srvxyz\CompulinxCARoot 19 MyVPNCert.cer
4. After you retrieve the certificate, you must install it. This command imports the certificate into the appropriate store and then links the certificate to the private key.
Type certreq –accept -config and press ENTER
E.g certreq -accept -config srvxyz\CompulinxCARoot MyVPNCert.cer
So, you need to submit, retrieve and then accept.
Add the CA role using Server Manager. As mentioned the first thing to obtain on the VPN server is a server authentication certificate from the CA. You can do this using a variety of methods including these. Included is the following:
Using the Certificate Enrollment wizard with a standalone CA
1. In the Computer Certificates snap-in, right-click the Personal folder, point to All Tasks, point to Advanced Operations, and then click Create Custom Request.

2. Click Next
3. Click Proceed without enrollment policy, and then click Next.
4. In the Template field select No Template (Legacy Key) and For Request format, click either PKCS #10 or CMC. PKCS #10 is generally accepted by all CAs.

5. Click Next
6. Click the Details arrow, and then click Properties. You will need to configure all the certificate request options so that the issued certificate will be suitable for TLS/SSL.
- On the General Tab under Friendly Name type a name for your certificate and a description
- In the Subject name area under Type, click Common Name
- In the Subject name area under Value, enter the fully qualified domain name of the server, and then click Add e.g www.compulinxtraining.com
- In the Alternative name area under Type, click DNS
- In the Alternative name area under Value, enter the fully qualified domain name of the server, and then click Add e.g www.compulinxtraining.com
- Repeat the last few steps and add all necessary DNS names (both external Internet registered names and internal DNS name of the VPN srvxyz.compulinxtraining.local for example)

7. On the Extensions tab click the Key usage arrow. In the Available options list, click Digital signature, and then click Add. Click Key encipherment, and then click Add.

8. Click the Extended Key Usage (application policies) arrow. In the Available options list, click Server Authentication and Client Authentication, and then click Add.

9. On the Private Key tab, click the Cryptographic Service Provider arrow. Because we selected the Legacy key in step 4 above, the Microsoft RSA SChannel Cryptographic Provider is enabled.
10. Click the Key options arrow. In the Key size list, select a key size. If desired, select the Make private key exportable check box. Do not select either the Allow private key to be archived or Strong private key protection check box.

11. Click the Select Hash Algorithm arrow. In the Hash Algorithm list, select the desired hash algorithm. E.g SHA-1

12. Click OK and then click Next
13. Enter a path and file name indicating where the request file will be saved and select Base 64 format and click Finish
Next, submit the certificate request and complete certificate enrollment by using Certreq.exe
1. Open a command prompt
2. Type certreq -submit -config <CertificateRequest.req>
E.g certreq -submit -config srvXYZ\CompulinxCARoot c:\VPNCertReq
This should return a RequestID. The request for your certificate will need to be issued by the CA administrator (the request will be found in the Pending Request folder. Simply right click the request and issue it).
3. Type certreq –retrieve -config and press ENTER. Where the CertificateResponse is the name given to the certificate you get back from the CA and will be placed in the directory you run the command from in command prompt
E.g certreq -retrieve -config srvxyz\CompulinxCARoot 19 MyVPNCert.cer
4. After you retrieve the certificate, you must install it. This command imports the certificate into the appropriate store and then links the certificate to the private key.
Type certreq –accept -config and press ENTER
E.g certreq -accept -config srvxyz\CompulinxCARoot MyVPNCert.cer
So, you need to submit, retrieve and then accept.
No comments:
Post a Comment